19.1.12 NRx Enhancements
Modified 11.05.2013
Electronic
Prescribing of Controlled Substances (EPCS)
QS/1 is pleased to announce that its Pharmacy
Management Systems are now certified for the electronic prescribing of
controlled substances (EPCS). To attain this certification, NRx, PrimeCare
and RxCare Plus were enhanced to comply with the Federal DEA mandates
required for the processing of controlled substances. As of June 3, 2013,
QS/1 completed the certification process with SureScripts and ComplySmart
(an outside auditor).
Time Stamp
Added a Coordinated Universal Time (UTC) stamp
to all electronic prescription data records. The use of the UTC stamp
ensures that the receiver of a message knows the time regardless of the
time zone. The format of the data/time fields in the XML schema is CCYY-MM-DDTHH:MM:SS.FZ.
For example, 2010-01-01T16:09:04.5Z, where 16:09:04.5Z would be 16 hours,
09 minutes, 04 seconds, 5 fractional seconds and Z to denote UTC time.
The fractional seconds are optional. For simple data fields that do not
include the time portion, the format is CCYY-MM-DD.
Store Options for Controlled
Substance Processing
Added screens to support the pharmacist's
verification of the prescriber's electronic signature. Digital e-Prescription
signatures are required only for controlled substances. Functions include:
Added the option, Controlled
Substance Processing, to Store Control/Store Level
Options/Rx Filling. Default = unchecked (N). If Controlled Substance
Processing is Y/Checked, the following must be set in Store Control/Security
Access/Security Options:
Password
Expiration Days: Must be 90 days or less.
Maximum
Login Attempts: Must be five (5) or less.
Minimum Password Length:
Must be eight (8) or more.
Require Special Characters:
Check this field.
Require Upper/Lower
Case: Check this field.
NOTE: The same password may not be reused
within six (6) changes of the password.
If the above requirements are not met at
login the system displays an error message with the following information:
Password
must be a minimum of 8 characters.
Password
must include 1 special character.
Password
must include upper/lower case characters.
Reusing
a password used in last six password setups is not allowed.
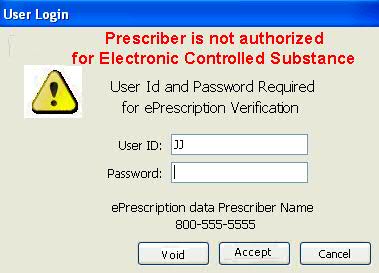
When a new e-Prescription
or refill response with a digital signature is selected, the Prescriber's
Service Level on the Prescriber Record/Electronic Rx screen is verified.
If the level is Controlled Substance (EPCS) = unchecked (N), a warning
screen displays. Options are:
Void: Click Void and
the system prompts for User ID and Password. The e-Prescription Status
is saved as Void-EPCS Auth.
Accept: Click Accept
and the e-Prescription Status is saved as Accepted-EPCS Auth. Fill
the prescription as usual.
Cancel: Click Cancel
and the warning screen closes and the previous screen displays.
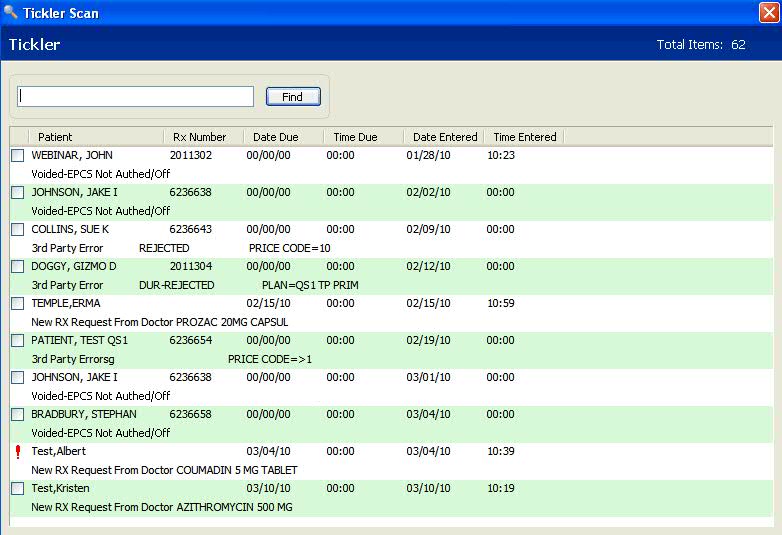
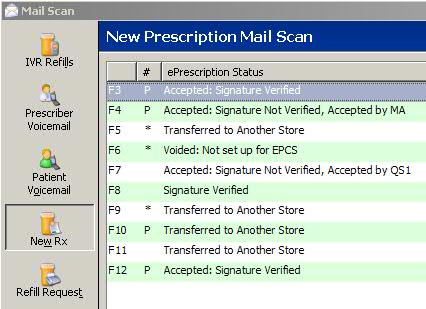
When the pharmacy receives
a new controlled drug e-Prescription it displays in the Mail scan.
If the pharmacy is not authorized for e-Prescription processing (QS1AUTH
= N) and the Store Option Controlled Substance Processing = Y, the
e-Prescription
Status is Voided: Not set up for EPCS and the
record is voided. If new e-Prescriptions from the prescriber are checked,
the Tickler
message is Voided-EPCS Not Authed.
-
NOTE:
Refill Responses are processed with the same messages as above.
NOTE:
Once an e-Prescription Record is voided it may not be undone.
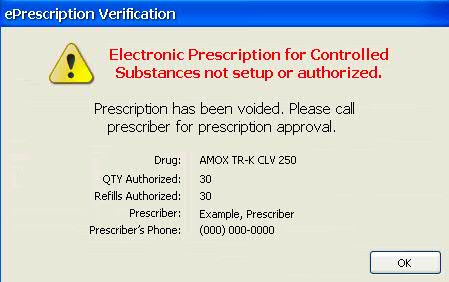
When
Tickler File Options are set up, if QS1AUTH = Y and the Store Option
Controlled Substance Processing = N, the e-Prescription Status is
Voided-Not Setup for EPCS and the record is voided. If new e-Prescriptions
from the prescriber is checked, the Tickler message is Voided-EPCS
Request-Not Setup. In each situation, an e-Prescription
Verification warning screen displays. Click OK
on the warning screen and the next Tickler Record to be processed
displays.
NOTE:
Refill Responses are processed with the same message as above.
NOTE:
Once an e-Prescription Record is voided it may not be undone.
Added
a new status field to the e-Prescription Record. This screen displays
in two places, 1) when the e-Prescription is selected for filling
and 2) from the Rx Record after it has been filled.
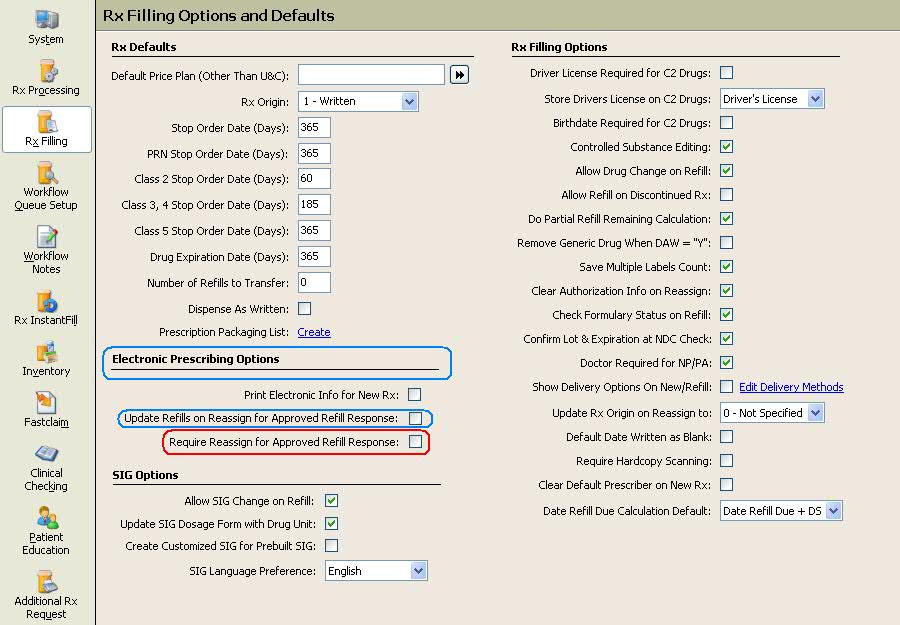
An
e-Prescribing option, Require Reassign
for Approved Refill Response, was added to Store
Control/Store Level Options/Rx Filling Options and Defaults.
This option restricts adding refills to an electronic refill response.
Changes include:
-
Adding Require
Reassign for Approved Refill Response. The default = unchecked.
When this field is changed from unchecked to checked, the field,
Update Refills on Reassign for Approved Refill Response, is automatically
updated to checked.
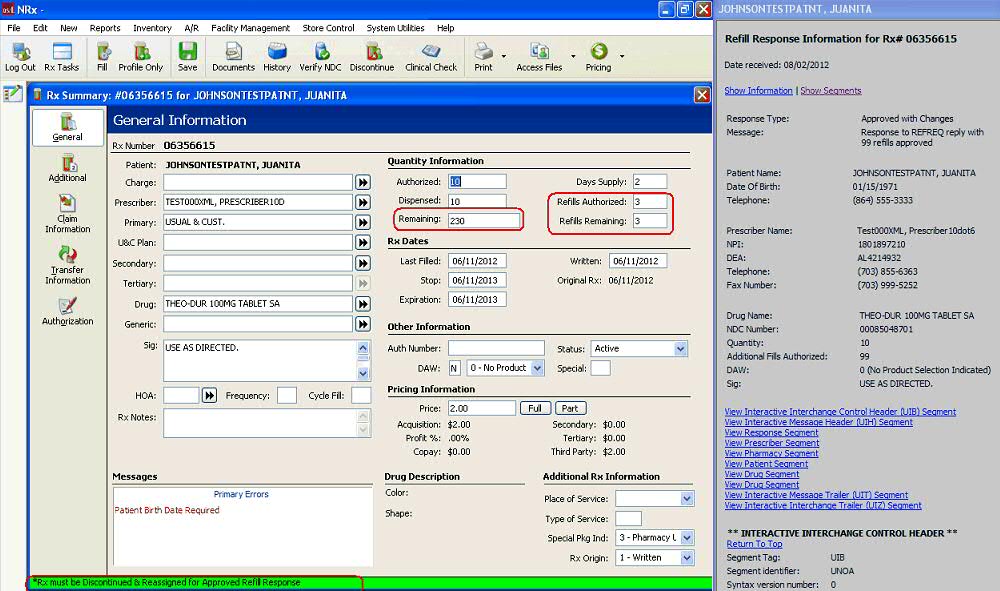
When a prescription
is accessed from the Refill Response Mail queue and the message
status is Approved or Approved with Changes,
the message, Rx must be Discontinued & Reassigned for Approved
Refill Response, displays at the bottom of the Rx
Summary screen.
NOTE:
If using the option, Require Reassign for Approved Refill Response, it
is recommended to also use the existing option, Update Refill on Reassign
for Approved Refill Response.
Pharmacist/Technician
Security Options
Added an Employee Security
Option, e-Prescription
Access, to Pharmacist/Technician Security Rights
under Prescription Access. Options are:
Deactivate/Delete:
Default = checked (Y). The system prompts for User Name and Password
to allow an employee with the authorization to deactivate/delete
the prescription. If unchecked, the warning message 'Not authorized
to Deactivate/Delete an e-Prescription' displays if employee attempts
this function.
Reactivate e-Prescription:
Default = unchecked (N). If unchecked, the warning message 'Not
authorized to reactivate an e-Prescription' displays if employee
attempts this function. If unchecked, the system prompts for User
Name and Password to allow an employee with the authorization
to reactivate the prescription.
Void e-Prescription:
Default = unchecked (N). If unchecked, the warning message
'Not authorized to void an e-Prescription' displays if employee
attempts this function. If unchecked, the system prompts for User
Name and Password to allow an employee with the authorization
to void the prescription.
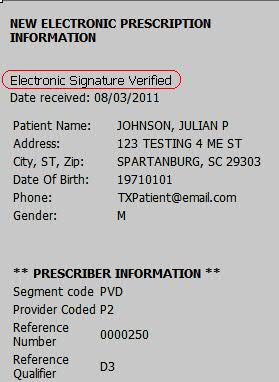
Added the status of
electronic signature verification for new and refill responses to
the New
Electronic Prescription Information screen. If
the signature is not verified, a warning
screen displays with the options to Accept, Cancel
or Void:
Accept: Click Accept
and the system prompts for User ID and Password. When employee
is verified as a pharmacist, the system saves the Employee ID
and e-Prescription Status as Accepted-Signature Verified. Fill/refill
the prescription as usual.
Cancel: If Cancel
is selected, the warning screen closes and the previous screen
displays. Any changes to the e-Prescription Record are recorded
in the e-Prescription Security Journal File.
Void: Click Void
and the system prompts for User ID and Password. When the employee
security access is verified, the system saves the e-Prescription
Status as Voided-Unverified Signature.
e-Prescriptions
in the Mail Scan
Added the ability to
void a
New Rx or Refill Response e-Prescription from
the Mail scan. This functionality is used for duplicate prescriptions
or prescriptions with unverified signatures. When void is selected,
the change is recorded in the e-Prescription Security Journal File.
Added the ability to
transfer an e-Prescription to another store from the Mail scan. The
employee must have security access to transfer the prescription. Prescriptions
transferred from the scan include New/Refill and Processed. e-Prescriptions
can also be transferred from the Prescription Record (Rx Summary/Transfer
Information screen). When a prescription is selected for transfer,
a warning
screen prompts for User ID and Password. When
the transfer is selected, both the Transfer Record and the e-Prescription
Record are saved to the Rx Summary screen. Transfer information is
also saved in the e-Prescription Security Journal File. During the
transfer process, the electronic
prescription information for the Rx displays
on the right side of the screen.
Added transfer functionality
to discontinued/reassigned prescriptions that have an e-Prescription
linked to them.
Added a Drug Class
check when a new/refill e-Prescription is processed and an alternate
drug is selected. If the alternate drug is a controlled drug, the
system automatically checks the prescriber's Service Level and the
Store Control/Store Level Option for Controlled Substance Processing.
The message 'Not Authorized for EPCS Processing' displays if either
option is unchecked (N).
e-Prescription
Data File
Moved all e-Prescription data into one file
which does not contain any other type of record. Due to EPCS regulations,
this file is maintained for a minimum period of two years.
Tickler File
Expanded the Tickler File size to accommodate
increased amount of electronic prescription data.
e-Prescription Security Journal File
Added an e-Prescription
Security Journal File: This journal records the data as it is received
from the prescriber and logs when the prescription is accepted, processed,
voided or transferred. The e-Prescription Security Journal File Control
Options are File and Description, in addition to Log File?, Updates?,
Log New?, and All Fields?.
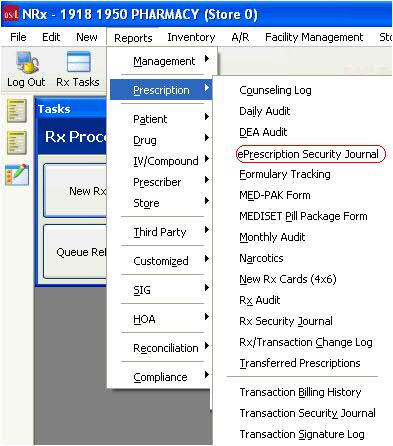
Added an e-Prescription
Security Journal Report to the Prescription Reports
menu.
Added the e-Prescription
File to File Maintenance Copy, Clear and Reload and the Purge and
Compression options. Due to EPCS regulations, you cannot purge this
file prior to two years from the current date. An employee must have
administrator rights to override the two-year limitation.
Added the e-Prescription
Security Journal File to File Maintenance Copy, Clear and Reload and
the Purge and Compression options. Due to EPCS regulations, you cannot
purge this file prior to two years from the current date. An employee
must have administrator rights to override the two-year limitation.
Rx/Transaction
Change Log
Added
authorization for electronic prescribing of Controlled Substances to track
prescriptions and transactions via the Rx/Transaction Change Log. This
ensures that all e-Prescribing data is protected. Due to EPCS regulations,
the Rx Audit File cannot be purged prior to two years of the current date
during File Maintenance. Employees with Administrator = Y and Security
Access = Y can bypass the two year restriction for purging the files.
If the restriction is bypassed, the system displays a warning message
to check with the State for the mandated time frame for keeping the file.
Click System on the
vertical icon bar and check Rx/Transaction Change Audit Trail. Click
Save.
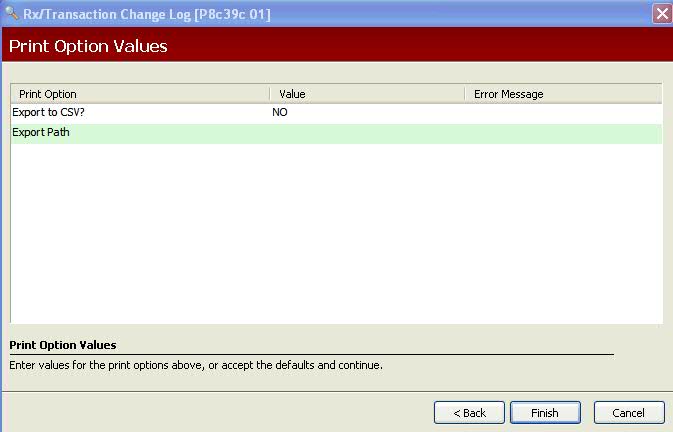
Added Print Options,
Export and Export Path, to the Rx/Transaction
Change Log.
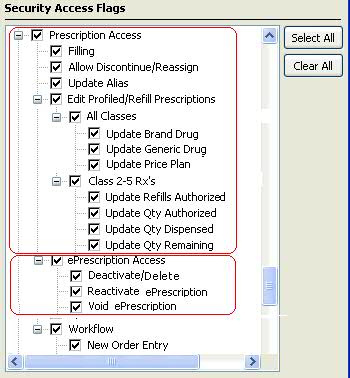
Security
Access Flags for Rx/Transaction Records
Added/modified Security Access flags to control
editing of Prescription and Transaction Records:
The option Allow
Brand Drug Change on Refill was moved from Store Control/Store
Level Options/Rx Filling Options and Defaults to Store Control/Security
Access/Manage Employees under Pharmacist/Technician Security A sub-heading,
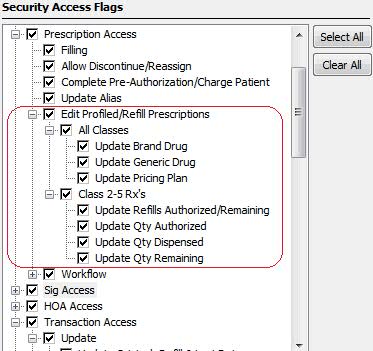
Edit
Profile/Refill Prescriptions, was added to Prescription
Access Security Options. There are two categories under this heading
- All Classes and Class 2-5 Rx's.
Rights/Prescription
Access and renamed Update Brand
Drug.
All Classes: This
setting applies to all prescriptions whether profiled or filled.
Options for All Classes include: Update Brand Drug, Update Generic
Drug and Update Pricing Plan. The default setting for Update Brand
Drug for new Pharmacist Employee Records = Checked. The default
setting for new Technician Employee Records = Unchecked. The default
setting for Update Generic and Update Price Plan for new Pharmacist
or Technician Employee Records = Unchecked.
Class 2-5 Rx's:
This setting applies to Class 2-5 prescriptions whether profiled
or filled. Options for Class 2-5 Rx's include: Update Refills
Authorized/Remaining (formerly Update Refills Authorized on C2-C5
under Prescription Access), Update Qty Authorized, Update Qty
Dispensed and Update Qty Remaining. The default setting for all
options for new Pharmacist Employee Records = Checked. The default
setting for all options for new Technician Employee Records =
Unchecked.
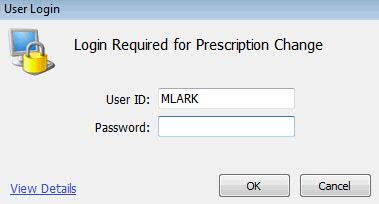
If any option in Edit
Profile/Refill Prescriptions is Unchecked and a change is made and
Save is selected, a Login
Required screen displays. If the employee does
not have the security access to make the change, the edit is not saved
and the system returns to the Prescription Record.
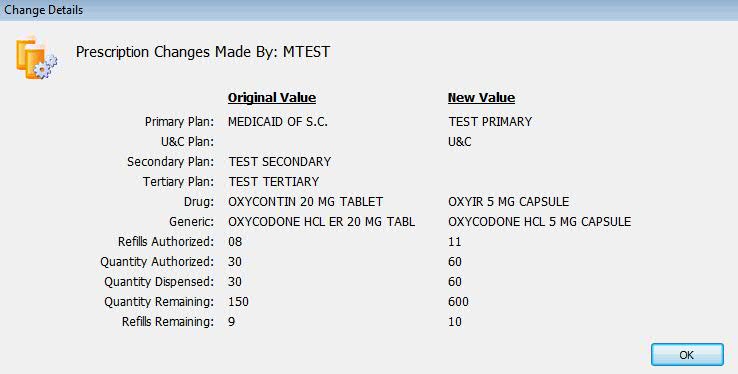
The Login Required
screen View Details link displays fields in two columns. The original
fields are on the left and the changed fields display in red on the
right. For Prescription Records for all drug classes, the following
fields can be changed:
Primary Price
Plan
Usual and Customary
Price Plan
Secondary Price
Plan
Tertiary Price
Plan
Brand Drug
(Drug Dispensed if Generic is not linked)
Generic Drug
For Prescriptions
Dispensed for C2-C5 Drugs: Refills Authorized, Qty Authorized,
Qty Dispensed, Qty Remaining and Refill Remaining
The
default setting for these four options is checked if Transaction Access
= Checked. If Transaction Access = Unchecked, then the four options are
unchecked. If Update Checked Out is checked, it overrides the options
above.
NOTE:
The drug cannot be changed on the Transaction Record.
Prescriber
Record/Electronic Rx Screen
The
following fields were added or modified on the Prescriber
Record/Electronic Rx screen. This is to prevent electronic
refill requests being sent to prescribers who do not accept them. These
fields are available in Batch Record Updates.
e-Prescription
Transaction Types
Implemented
changes for NCPDP 10.6 and Surescripts 10.6. These updates include implementation
changes for the following e-Prescription Transaction types:
New
prescription from the prescriber to the pharmacy
Message
from the pharmacy to the prescriber requesting additional refills
Response
from the prescriber to the request from the pharmacy for additional
refills
Status
message to relay acceptance of a transaction back to the sender
Error
message to indicate the request was terminated
Verification
message sent if sender asked for verification that recipient did receive
the message
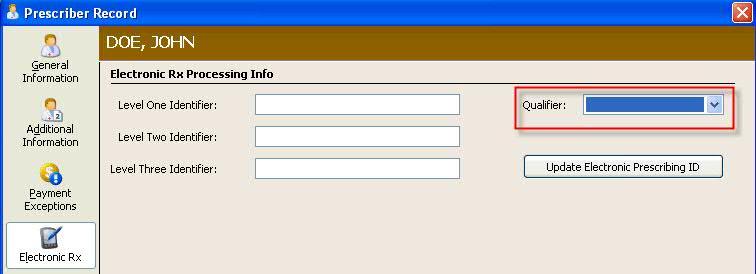
Prescriber
Record
Added Qualifiers
to the Prescriber Record drop-down list for the
Level One Identifier under Electronic Rx Processing Info. The qualifiers
are: C = Clinic, M = Mailbox, D = Prescriber and N = Local Network.
If a new value is added to the ECL, the value can be manually entered
in the drop-down list.
Electronic
Prescription Flags
There
are three options for handling the Do Not Fill/Profile Flag for new electronic
prescriptions:
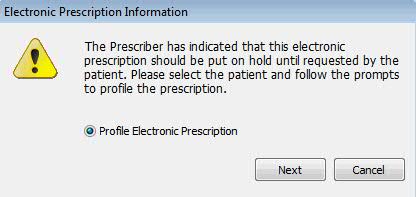
When
Profile Electronic Prescription is selected, click Next and the Patient
Record displays. Click New Rx and the new order screen displays. However,
the Fill option is disabled and the message, This Rx must be profiled,
displays as the Price Plan Error Message.
The prescriber has
indicated that this electronic prescription should be checked for
interactions with other medications for the patient, but never filled.
Select the patient and follow the prompts to either profile the prescription
or add to the medication list on the patient chart. After the patient
is selected from the scan or added to the system, three options display:
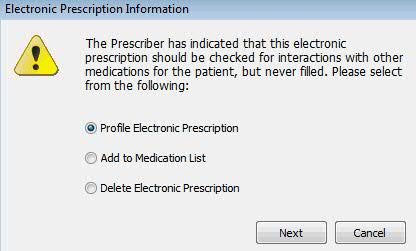
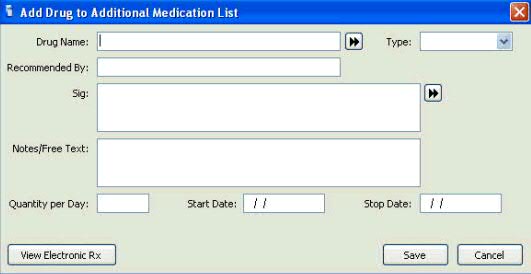
When
Add to Medication List is selected, the window, Add
Drug to Additional Medication List, displays with
electronic prescription information in another window.
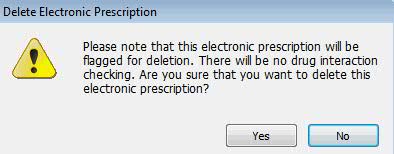
When
Delete Electronic Prescription is selected, the system flags the prescription
for deletion in the New Prescription
Mail Scan.
New Electronic Prescription Information Window
Added a side window, New Electronic Prescription
Information, to display when processing a new prescription or refill response.
This window displays Patient Information, Provider Information (Pharmacy)
and Provider Information (Prescriber). Message information populated on
this screen includes:
- New prescription from
the prescriber to the pharmacy
- Pharmacy to the prescriber
requesting additional refills
- Response from prescriber
to the pharmacy request for refills
- Acceptance of a transaction
back to the sender
- Error message when
request is terminated
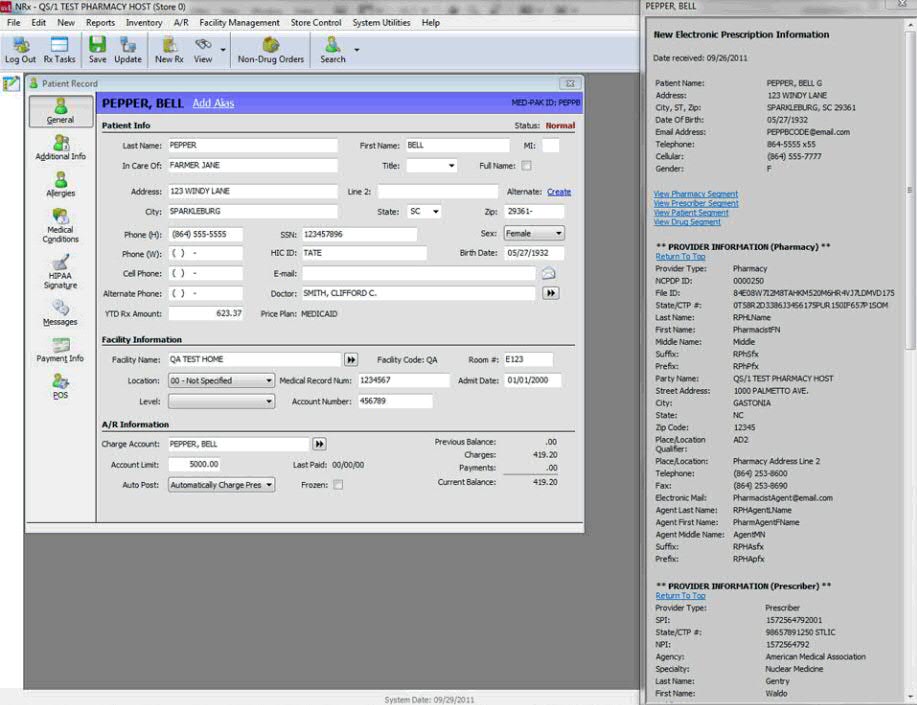
When an electronic Refill (Response) or NewRx is selected
in the Electronic Claims Log, the system automatically displays the Refill
Response or NewRx scan:
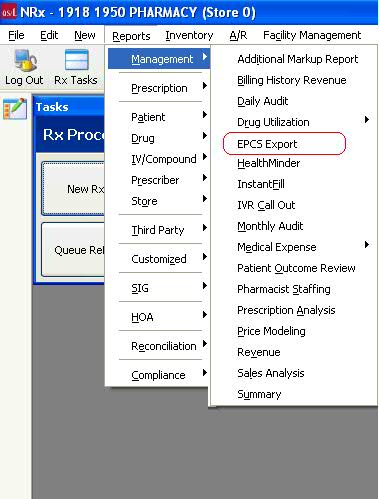
EPCS Export Option
Added an EPCS Export option to Management
Reports and Employee
Security. The report option displays only if the Store
Control/Store Level Option Controlled Substance Processing = Y (checked).
The input files for this export are the Prescription, Transaction, Patient
and Prescriber Records.
End of EPCS
Enhancements ________________________________________________________________________________________________________________________
Prescription Processing/Refill
Request
Updated the Refill Request window to check
a patient's profile for prescriptions with equivalent drugs using the
GCN Sequence Number. If any are found, the list of equivalents displays.
The user has the option to select a prescription from the list displayed
or continue with the refill request. This prevents sending a refill request
for an existing prescription.
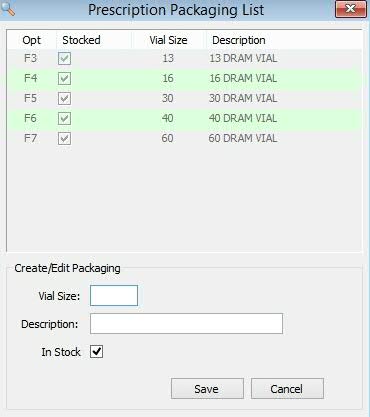
Prescription Processing/Quantity
per Dram
Changed
the Quantity per Dram field on the Drug
Record/Inventory screen to display
up to eight (xxxx.xxxx) characters to support more precise measurements.
From the Drug Record/Inventory screen, click Drug
per Vial to display a list of
vial sizes currently available in stock. Bottle sizes not in stock are
greyed out. Click Calculate
and the Calculate Quantity Per Dram
wizard displays. Follow the instructions to find the calculated quantity
per dram for the drug.
This field is part of the feature, Suggested
Prescription Bottle Size/Packaging List, which is used primarily for pills
dispensed via pill dispensing systems because it maximizes bottle usage
by suggesting the appropriate size bottle for the medication dispensed.
After calculating the Quantity per Dram, access
the Store Level Options/Rx Filling Options. Click Create next to Prescription
Packaging List and populate with the amount just calculated
for the Quantity per Dram field.
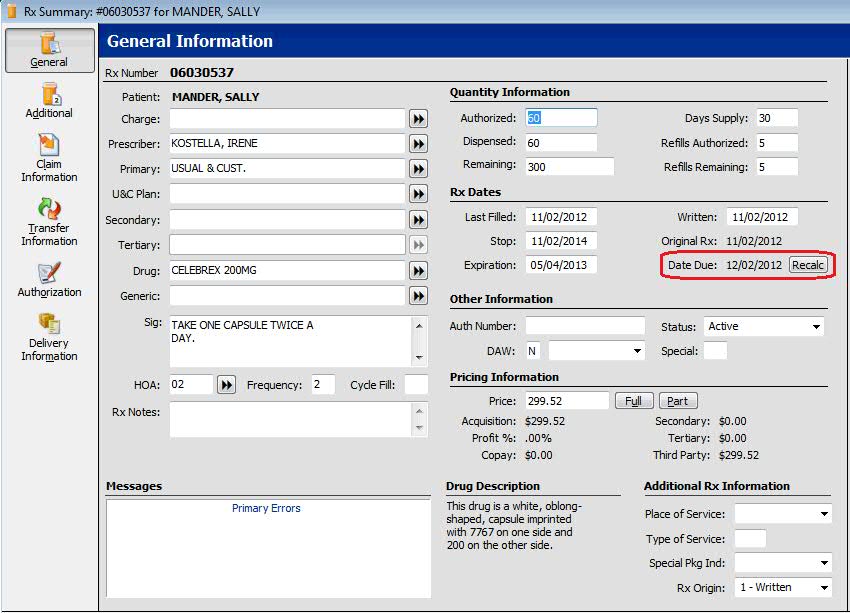
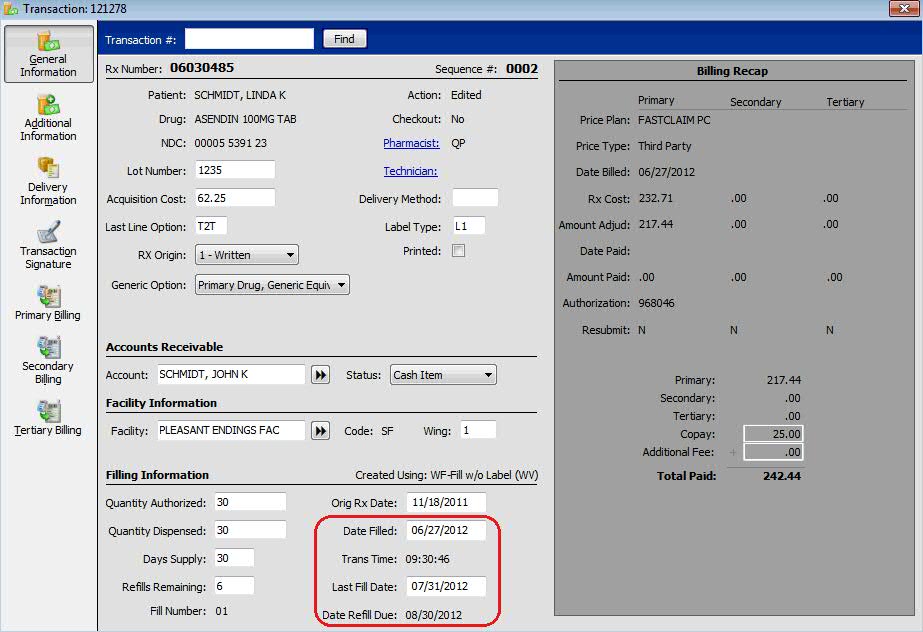
Prescription Processing/Refill
Due Date
Added
the option to view, edit and recalculate the refill due date. The Date Due field displays on the
Rx Summary/General Information
screen. Click
Recalc to recalculate the due date based on the last filled date + days
supply.
Added
the Date Refill Due to the Transaction/General
Information screen under Filling Information. This
field is a display only field. These same changes are available in Transaction
Batch Record Updates function under System Utilities.
Prescription Processing/High
Dollar Alerts
Added
an alert to warn the pharmacy when a new prescription is above a certain
dollar amount, or if there is an increase from the previous fill above
a certain dollar amount. Added the option, High
Dollar Alert in Tickler/Workflow, to Store
Level Options/Pricing. There are two new options directly below this
option, Alert if First Fill Greater
than Amount and Alert if Increase
Greater than Previous Amount. These two options are greyed out
if the High Dollar Alert is not checked.
Functionality
for the Alert if First Fill Greater
than Amount option:
This dollar amount
is only checked for the original fill. If the patient amount is above
the dollar amount entered in Pricing Options, an alert is entered
in Workflow or Tickler. If Workflow is used, the alert is entered
as a Workflow Message and sent to Error Resolution. If the pharmacy
does not use Workflow, a Tickler Message is entered.
If the prescription
is a cash prescription, the total amount is checked. If it is a third
party prescription, the co-pay amount is checked.
This option does
not apply to subsequent fills.
Functionality
for the Alert if Increase Greater than
Previous Amount option:
This dollar amount
is only checked for refills. If the difference between the patient
dollar amount increases more than the dollar amount entered in Pricing
Options as compared to the patient amount from the previous fill,
an alert is entered in Workflow or Tickler. If Workflow is used, the
alert is entered as a Workflow Message and sent to Error Resolution.
If the pharmacy does not use Workflow, a Tickler Message is entered.
If the prescription
is a cash prescription, the total amount is checked. If it is a third
party prescription, the co-pay amount is checked.
If the prescription
has been discontinued and reassigned, the system checks the amount
from the last fill of the discontinued prescription.
If the total amount
for a batch increases above the dollar amount entered for this option,
the alert displays. This logic applies if the number of prescriptions
for a patient are the same from month to month. For example, if the
batch had five prescriptions one month and six the next month, the
alert does not display. The amount of the last batch and the number
of prescriptions in the batch are saved on the Patient Record but
are not visible to the pharmacy.
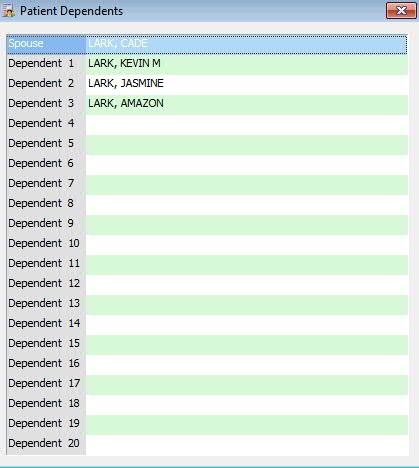
Patient Record/Assign
Spouse and Dependents
Added
the ability
to assign spouse and dependents to a Patient Record. This option is available
only in conjunction with ShipRx, QS/1's
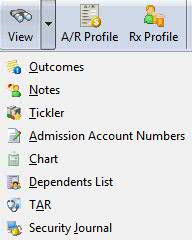
Shipping Management Module. Access the Patient Record and click the View
drop-down. Click Dependents
List. Updated report sort, select and print options
to include PD-Patient Spouse ID in the Patient Demographics File. This
list is for informational
purposes only.
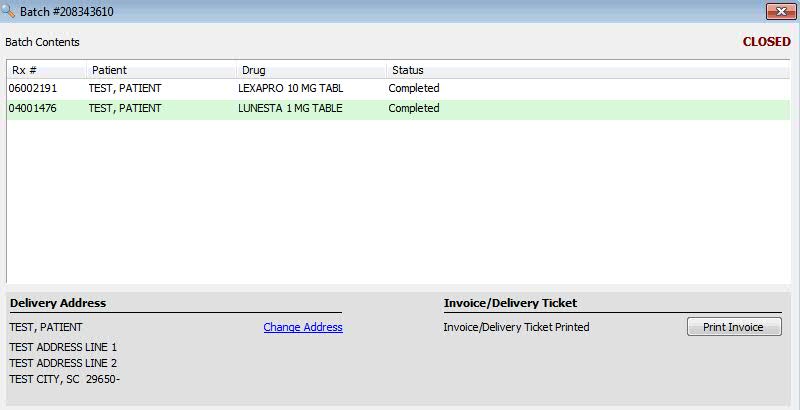
Invoice/Delivery Ticket
Updated
the Invoice/Delivery Ticket to print the batch barcode in the header area
of the ticket. Added the following to each detail line: patient name,
safety caps information, drug name, NDC, quantity dispensed and drug group.
This option is available only in conjunction with ShipRx.
Routing Slip
Updated the Workflow Label/Dispense queue
to print a routing slip for the batch/order when prescriptions are processed
from the queue. If NDC checking is set to YES, the routing slip prints
before the NDC check. The following information prints on the slip: ROUTING
SLIP in the top right corner, Payments Pending and Total Amount Due.
Updated the Batch Details window to display
a section for the routing slip in the bottom right corner. Invoice
information only displays after the batch has been
completed, charges have been processed and the Point-of-Sale transaction
has been created.
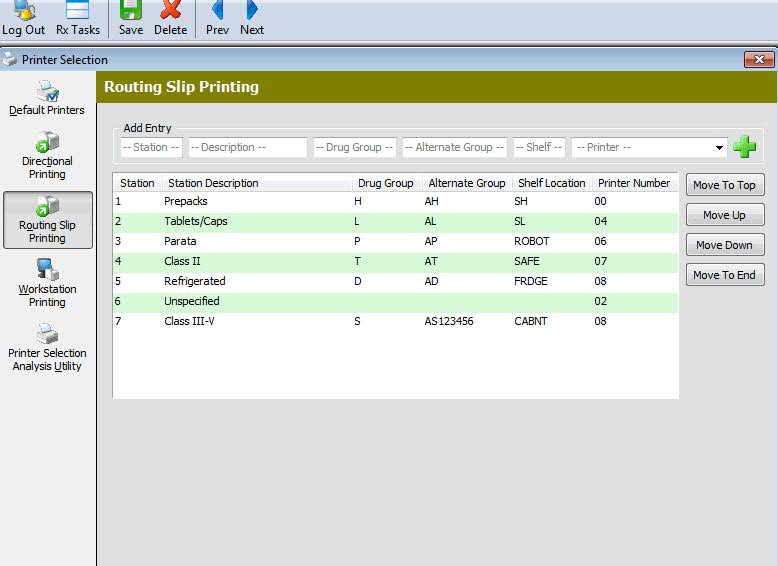
The Printer Selection window includes Routing
Slip with a check box and the selection of a default printer. These Routing
Slip options are available only in conjunction with ShipRx.
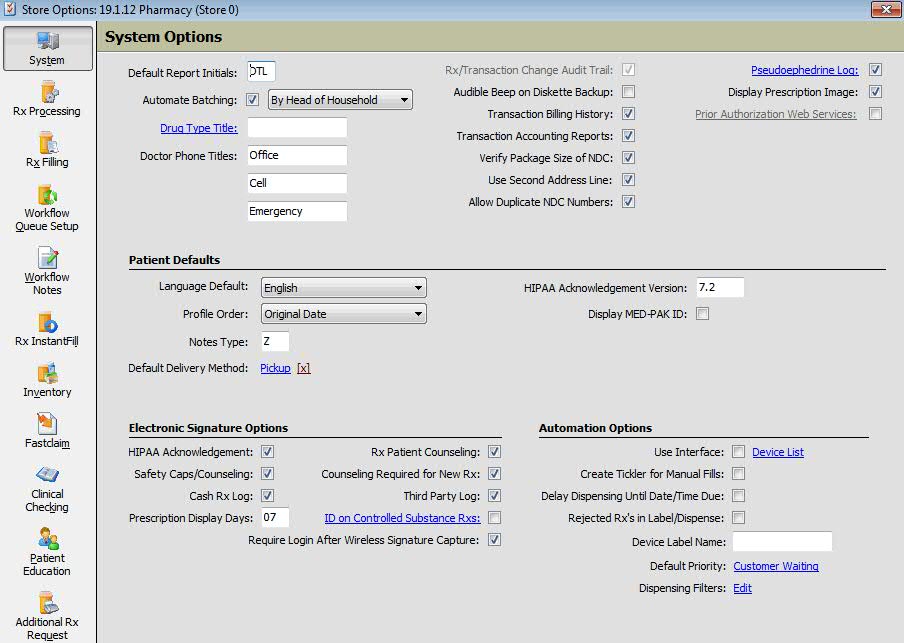
Default Delivery Method
Added the ability to default the Delivery
Method in Store
Options/Store Level Options/System Options. When a
new patient is added to the system, the Delivery Method on the Patient
Record/Additional Information screen defaults to the option selected in
Store Options. However, the method on the Patient Record can be changed.
This option is store specific.
Default Shipping Method and
Priority
Added the ability to default the Shipping
Method and Priority for standard and refrigerated orders. This eliminates
the need to manually enter this information for each order and having
to correct prescriptions filled via InstantFill.
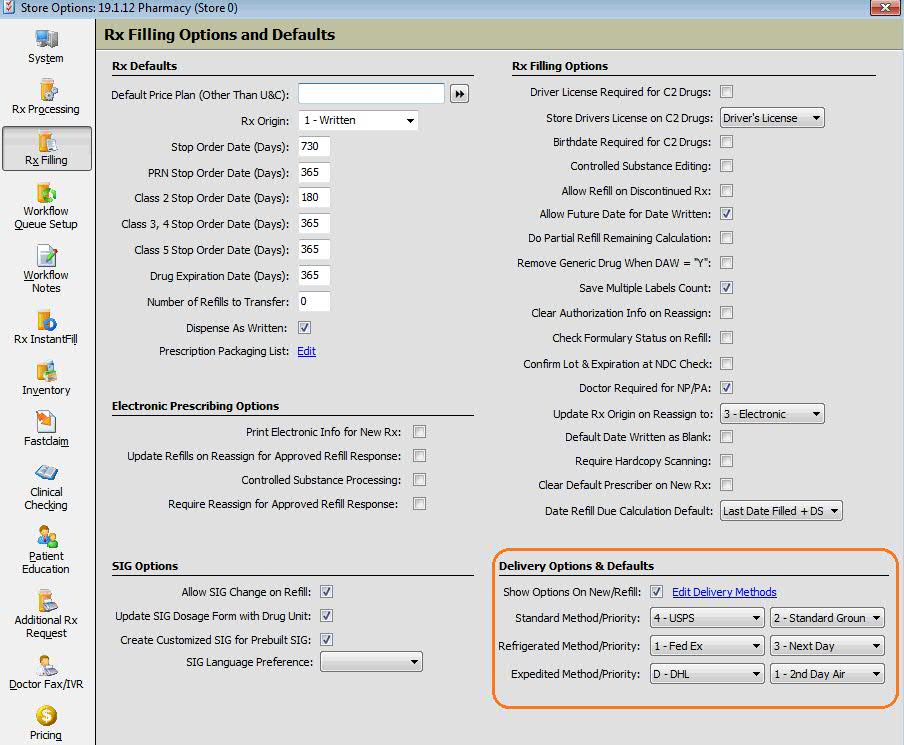
Added
a new section, Delivery Options & Defaults to Store
Options/Store Level Options/Rx Filling Options and Defaults.
Renamed the field, Show Delivery Options On New/Refill to Show Options
on New/Refill. Moved the field from Rx Filling Options to this new section.
Added three new options under Show Options on New/Refill:
Standard Method/Priority:
A drop-down list displays all shipping methods, followed by a drop-down
list of all priorities.
Refrigerated Method/Priority:
A drop-down list displays all shipping methods, followed by
a drop-down list of all priorities.
Expedited Method/Priority:
A drop-down list displays all shipping methods, followed by
a drop-down list of all priorities.
Updated
prescription processing to populate the shipping method and priority from
the store defaults. If the drug is marked as refrigerated, the refrigerated
default is used. Otherwise, the standard default is used. The defaults
are populated when a new prescription is entered or an existing prescription
is accessed for refill.
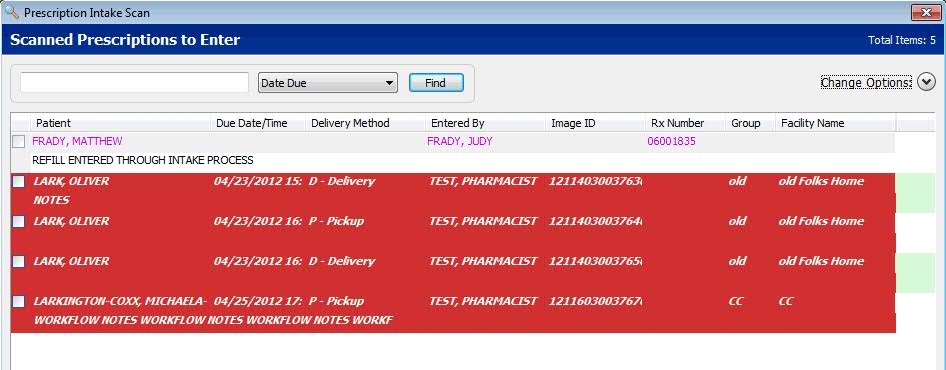
Prescription Intake Queue
Added the option, Mark Complete, to the Prescription
Intake Scan toolbar. Select a record on the scan,
click Mark Complete when processed and the prescription is removed from
the queue. The scan displays a # in the select area if a record is marked
for deletion. If marked for deletion, it cannot be selected.
Automatically Override DUR
Messages
Added
the option to automatically override DUR messages before the message is
sent to QS/1 for future refills. Features include:
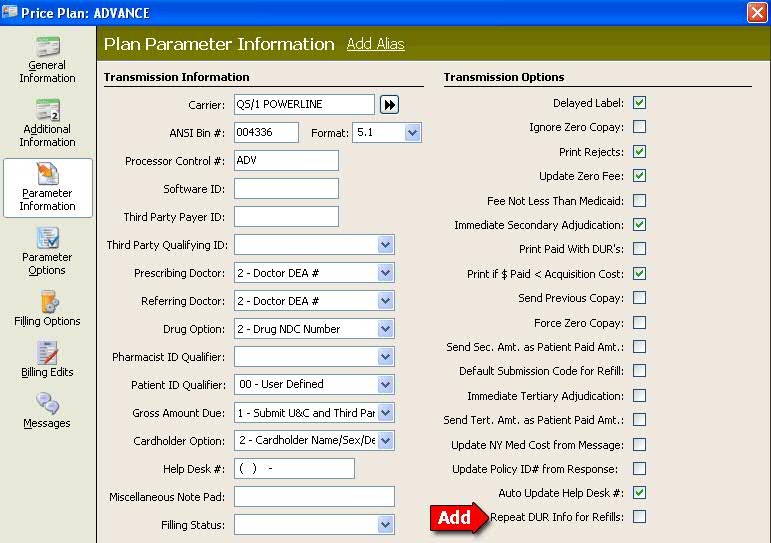
A
new Price
Plan option, Repeat DUR Info for Refills. Default
= Unchecked (No). If the Price Plan is Retail or Cash, the option
does not display.
Check
this option and the system duplicates the Patient Outcome Records
from the previous prescription and sends this information with the
claim refill for that Price Plan. If Outcome Records have been deactivated,
they will not be duplicated. A warning
message displays when a refill is sent and the
option is activated.
Repeat
DUR Info for Refills is a Batch Record Update option for Price Plans.
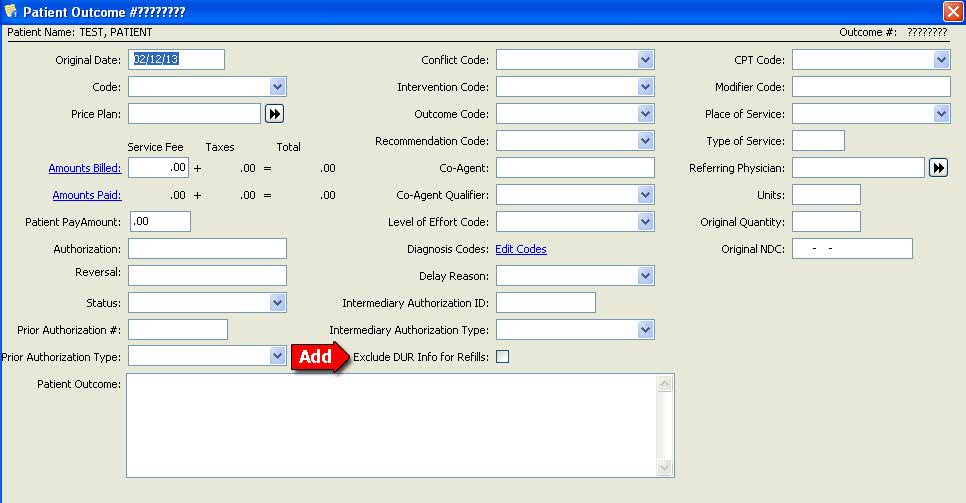
A
new Patient
Outcome Record option, Exclude DUR Info for Refills.
Default = Unchecked (No). Check this option and claim refill information
is not submitted regardless of the Price Plan option, Repeat DUR Info
for Refills. This flag overrides the Price Plan option.
Workflow
Queues/Column Additions for Batch Processing
Changes to improve and
simplify batch processing in Workflow:
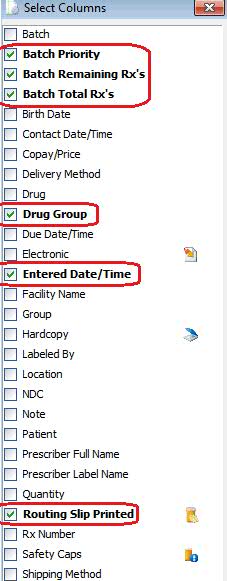
Added
columns
to Workflow queues. The columns include
the drug group, number of prescriptions in the batch, number of uncompleted
prescriptions in the batch, the date entered*, routing slip printed
indicator (for sorting)* and batch priority.
*Available
only in conjunction with ShipRx.
Added a scan
batch Workflow view which displays batches, not
the individual prescriptions in the batch. The batch barcode can be
scanned to select a batch. The batch views have their own characteristics
(colors, columns, etc.) and can be customized for each step (Label/Dispensing,
QA, Status, etc.). The dashboard view has the option to display batch
counts or counts of individual prescriptions.
Added the option
to not display batches or individual prescriptions
in Label/Dispensing until all prescriptions in a batch are ready for
Label/Dispensing. Added the option to only display batches that are
ready for the step displayed in the Workflow scan. This applies to
the batch view as well as individual prescription views.
Added the ability to
manage a batch from
the Workflow scan. Highlight the batch
in the Workflow scan and select the Manage Batch function. This opens
the batch to allow removing a prescription, splitting the batch, changing
the due date/time or changing the priority.
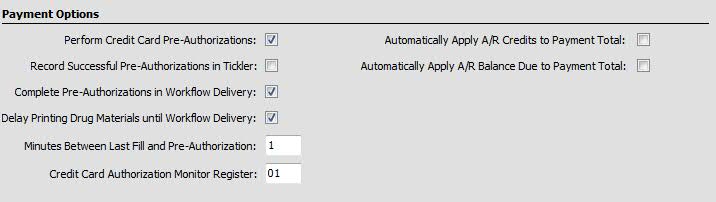
If credit card pre-authorizations
are being utilized, changed the system to allow batches to be split
after a batch reaches Label/Dispensing, QA or Delivery/Will Call.
This requires reversing the pre-authorization and creating a new pre-authorization
for the prescriptions staying in the batch and continuing through
the process.
Added ability to automatically
split batches when necessary. In general, patients in a cardholder
(head of household) group should all be in the same batch. However,
if any of the following conditions occur, the batch should be split
in order to prevent errors or violate rights: a member or spouse PHI
flag is on, separate address flag is on, separate credit card is on,
refrigerated drugs and different shipping priority.
If
delivery addresses do not have a name associated with the address, the
following rules should apply. When the shipping address is printed, the
head of household name should print if prescriptions for the head of household
are in the batch. If no prescriptions are for the head of household, the
spouse's name should print if prescriptions for the spouse are in the
batch. If no prescriptions for the head of household or spouse are in
the batch, the name of the first "of age" dependent in the batch
should print for the address. If only minor dependents are in the batch,
print the head of household name.
Changes
to improve processing multiple bottle/package prescriptions in Workflow:
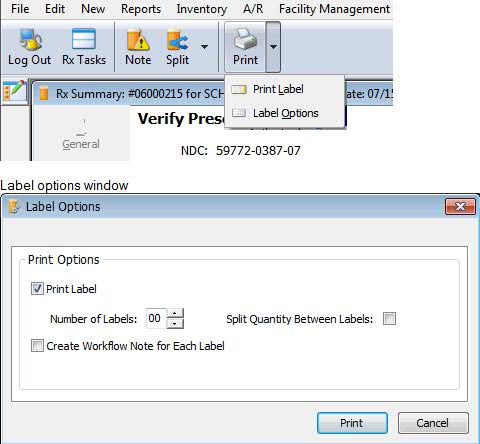
Added a function,
Label Options,
in Label/Dispensing to print multiple labels. When selected, a window
displays the option to enter the number of labels, split the quantity
between labels and enter a Workflow Record for each label. When labels
flow through Workflow, each bottle/package should be scanned in QA
and Delivery/Will Call. The batch is not completed until all individual
bottles/packages are scanned. This information is stored with the
prescription for future fills.
Changes
to improve error handling in Workflow:
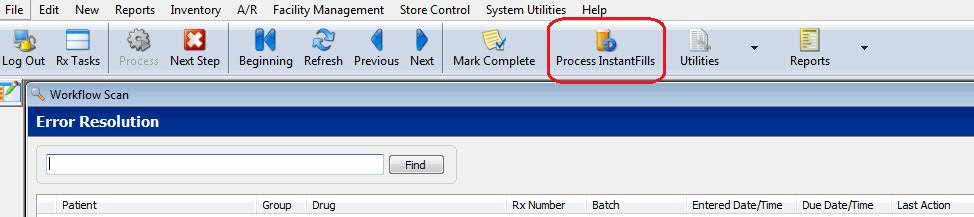
Added an option,
Process
InstantFills, to process pended
prescriptions in Error Resolution. When the processing
of InstantFill prescriptions is complete, any pended prescriptions
that have a date and time due that is the same, or prior to the current
date and time due are submitted. This includes InstantFill prescriptions
that do not have a date and time due.
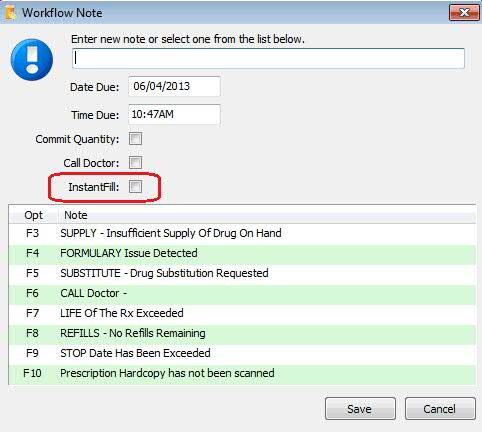
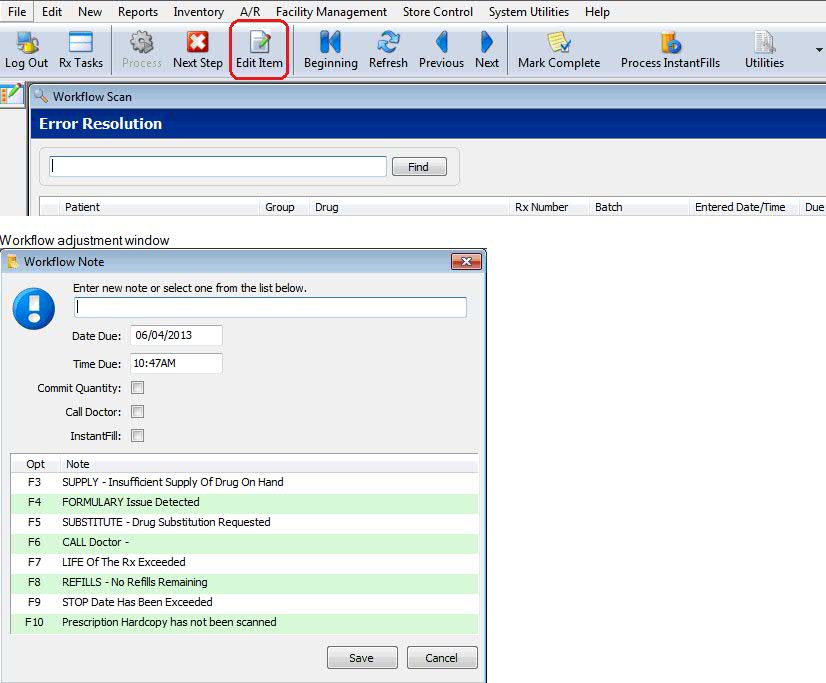
Added the option
to edit the due date/time, Workflow message,
InstantFill indicator and call doctor indicator when a prescription
is in the Error Resolution queue.
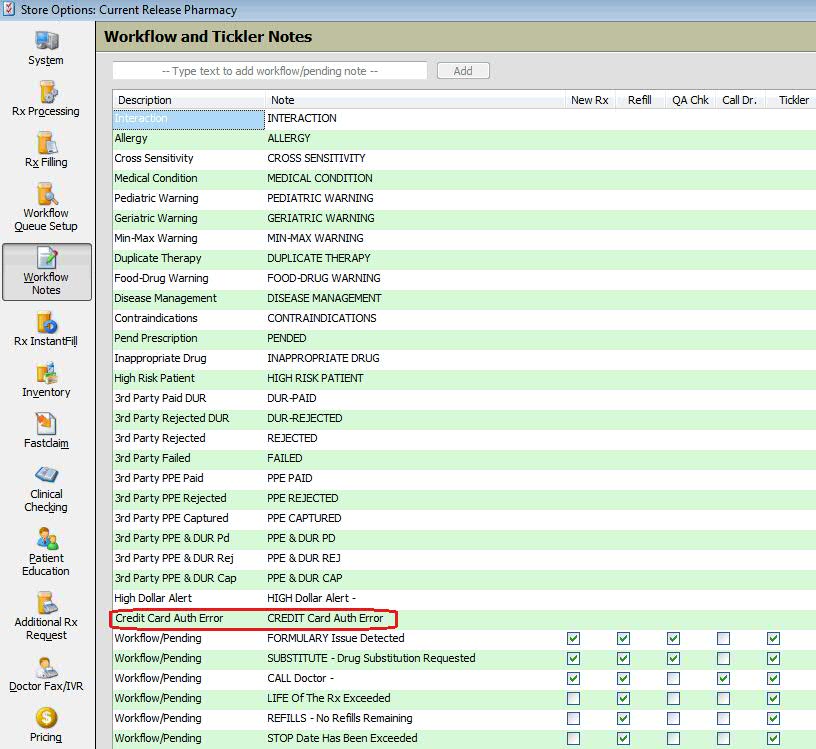
Added a default message
to Store
Control/Store Level Options/Workflow and Tickler Notes
for credit card pre-authorization and authorization errors.
Changes
to improve labeling, routing slip printing and dispensing functions in
Workflow:
Created a Routing
Slip Table which identifies dispensing stations
and printers based on the drug group, alternate drug group or shelf
location. To access, click File/Printer Selection/Routing Slip Printing
from the main menu. When prescriptions are entered in a batch, the
batch is evaluated and the routing slip station is updated on the
Batch and Workflow Records. The batch always ends up with the first
dispensing station listed for all the drugs in the batch. When all
prescriptions in the batch are adjudicated and the batch is released
to Label/Dispensing, the routing slip is directed to print to the
printer at the appropriate dispensing station.
Added Dispensing
Station to Workflow options for selection and to Batch Records. The
Dispensing Station is a column in Workflow scans.
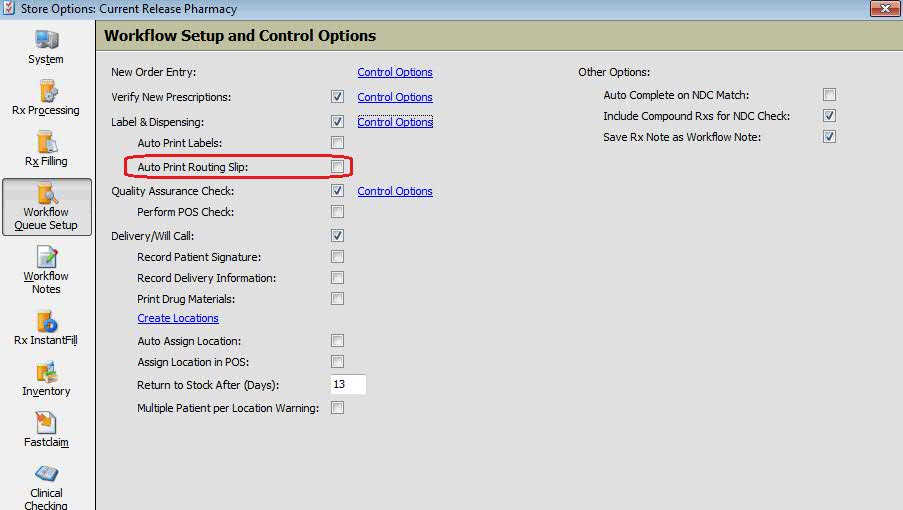
Added an option,
Auto Print
Routing Slip, to Store Control/Store Level Options/Workflow
Queue Setup. Check this field to automatically print the Routing Slip
at the appropriate dispensing station when the batch is ready for
Label/Dispensing. The Routing Slip is then scanned into Workflow and
all labels for the prescriptions in the batch are selected for printing.
Workflow
Delivery/Will Call Queue/Print Monograph, Nutrilink and MedGuide
Updated Store Control/Store Level Options/Pricing
to include an option, Delay Printing
Drug Materials until Workflow Delivery/Will Call, under Payment
Options. Added an option, Print
Drug Materials, under Delivery/Will Call in Store Control/Store
Level Options/Workflow Queue Setup.
If the option to
delay drug material printing is checked, the label prints in Verification
or Label/Dispensing, but not the Monograph, Nutrilink or MedGuide for
all prescriptions. If the option, Print Drug Materials is not checked,
and the system is authorized for ShipRx, the prescription delivery method
is pre-pay and the ShipRx option for Delay Printing Drug Materials until
Workflow Delivery/Will Call is checked, the label prints, but the Monograph,
Nutrilink or MedGuides do not print for NRx Delivery prescriptions only.
Drug material for other prescriptions continues to print.
 If the Monograph is
embedded as part of the label (Routine 317 or 519), Monographs are not
skipped and cannot be delayed. The Nutrilink and MedGuide will be delayed.
MedGuides are only affected when using the LDM web service interface.
If the Monograph is
embedded as part of the label (Routine 317 or 519), Monographs are not
skipped and cannot be delayed. The Nutrilink and MedGuide will be delayed.
MedGuides are only affected when using the LDM web service interface.
Updated the workflow delivery process to determine
if the Monograph, Nutrilink or MedGuide should be printed when processing
items for delivery. If card pre-authorizations are not required (payroll
deduction or other payment types not related to a credit card), drug information
prints immediately when the prescription is processed from the Delivery/Will
Call queue.
Drug information prints
for compound prescriptions when Print
PEM is checked for each drug on the template.
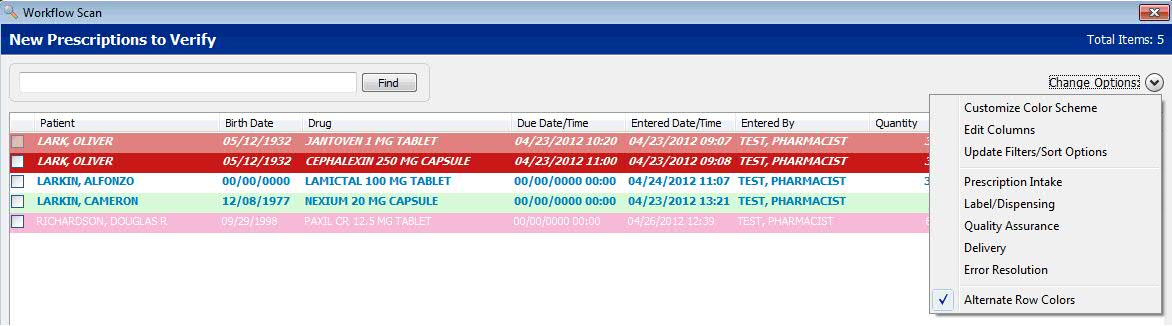
Customized Workflow Queues
Customized the Workflow Verify New Orders,
Label/Dispensing, Quality Assurance Check, Delivery/Will Call and Error
Resolution queues to display up to 20 records per screen. The text of
each line in the display can be color coded based on a user-defined custom
color setup. All records without an assigned color choice display with
black text.
If
preferences are not defined, the column defaults for the queues are:
Verify New Orders:
Patient, Drug, Rx Number, Batch, Date Entered, Date/Time Due, Entered
by, Note
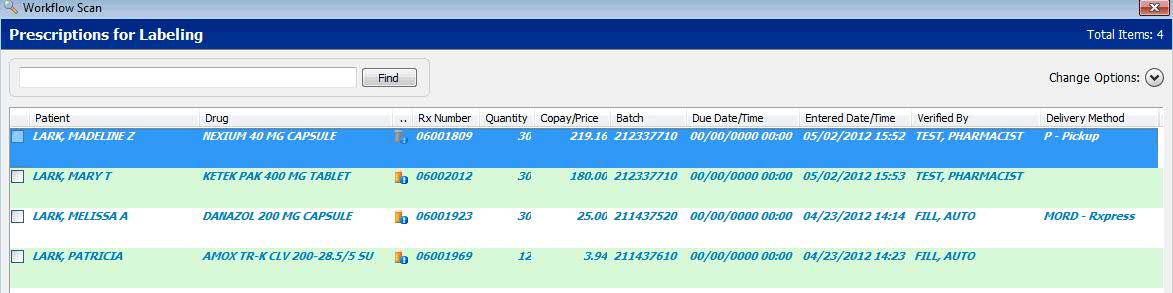
Label/Dispensing: Patient,
Drug, Rx Number, Batch, Date Entered, Date/Time Due, Verified By,
Note
Quality Assurance Check:
Patient, Drug, Rx Number, Vials (ADS Only), Automation Status (ADS
Only), Batch, Date Entered, Date/Time Due, Labeled By, Note
Delivery/Will Call:
Patient, Location/Bag Number, Drug, Rx Number, Vials (ADS Only), Automation
Status (ADS Only), Batch, Date Entered, Date/Time Due, QA Check, Note
Error Resolution: Patient,
Drug, Rx Number, Batch, Date Entered, Date/Time Due, Last Action,
Note
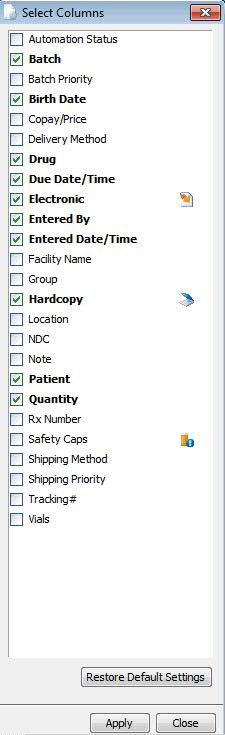
To
change the default settings, use the Select
Columns window.
Added a drop-down menu, Change
Options, on the right side of the screen that displays
the following options:
Customize Color Scheme:
Displays a window with the option to select row colors based on time
due or status.
Edit Columns: Displays
the Select Columns window to the right of the Workflow queue. The
columns currently selected for display are bold. Options include:
Apply:
Applies changes to the currently shown instance of the queue.
Changes applied are for the currently logged in User ID only.
Close:
Closes the column selection window.
Restore
Default Settings: Restores the column selections to the defaults
defined above. Changes are not applied until Apply is selected.
Update Filters/Sort
Options: Closes the Workflow queue and displays Workflow Sort/Select
options for re-selection.
Prescription
Intake: Displays only if the currently logged
in user is authorized for Prescription Intake. When selected, the
queue closes and the prescriptions ready to enter display.
Updated
the intake queue to support sorting by delivery method. Delivery Method
is listed in the drop-down selection list in the Find function.
Verify
New Orders: Displays only if the currently logged
in user is authorized for Verify New Orders. When selected, the queue
closes and orders ready for verification display.
Label/Dispensing:
Displays only if the currently logged in user is authorized for Label/Dispensing.
When selected, the queue closes and orders ready for labeling/dispensing
display.
Quality
Assurance: Displays only if the currently logged
in user is authorized for Quality Assurance. When selected, the queue
closes and orders ready for the quality assurance check display.
Delivery/Will
Call: Displays only if the currently logged in
user is authorized for Delivery/Will Call. When selected, the queue
closes and orders ready for delivery display.
Error
Resolution: Displays only if the currently logged
in user is authorized for Error Resolution. When selected, the queue
closes and orders ready to be corrected display.
Added
a system prompt to save
queue preferences.
Added
the option to reorder columns, re-size columns and select which columns
display. When the system has been inactive for approximately 5-10 seconds,
the Customization Tips window displays with the message 'Do you want to
customize the workflow queue specifically for your User ID? Select a topic
below to learn more.' Topics are:
How can I add or remove
columns?
How do I move a column?
How do I change a column's
size?
How do I change my
color preferences?
Added
a window to display the color selections available. Color selections are
per queue, per user ID, with up to 100 color selections available for
each queue. Color selections can be set by Time Due or Status.
Updated new prescription entry screens to
include the patient birth date. Formats
1 and 2 display the birth date to the right of the
patient name. Format
3 displays the birth date to the right of the patient
age.
Updated the Prescription
Record to display the patient birth date beside the
patient name in the form caption.
Perform
Corrections in Workflow Quality Assurance and Label/Dispensing
Added
Control Options
to Store Level Options/Workflow Queue Setup to display additional information
in Quality Assurance and Label/Dispensing steps in Workflow. Click Control
Options next to Label/Dispensing and Quality Assurance to display options
for each queue. The options selected display on the Rx
Summary screen during the QA or Label/Dispensing step
of Workflow. Functions include:
If the option, Display
Patient Notes is selected, the Patient Notes window displays immediately
during QA and Label/Dispensing if notes are attached to the patient.
The NDC Verification
continues to display. If NDC check is turned off, the Verify Prescription
area only displays if one of the Control Options is selected.
The patient safety
cap alert only displays if the patient does not prefer safety caps.
The DUR Alert displays
in bold if it has not been viewed. If the alert has been viewed, DUR
Viewed displays.
SIG
Translation in Workflow Quality Assurance
When processing prescriptions for Spanish
patients, added a link on the SIG in Workflow Quality Assurance to display
the English translation.
Discontinued/Reassigned
Prescriptions in Workflow Verify New Orders
Added a field, Include Discontinued/Reassigned
Rxs in Verify New Orders, to the Workflow Queue Setup screen. The default
= unchecked (No). When checked, any prescription that is discontinued
or reassigned will flow to Verify New Orders. Any prescription that is
adopted and entered into the system through the transfer function will
also flow to Verify New Orders.
Prescription Status
Added the ability to sort by, and specify
a date range, for prescription status.
Pharmacy at a Glance
Created a default Store Level Option for Pharmacy
at a Glance (PAAG). When PAAG is opened from NRx, the counts default to
view only the currently logged-in store in a Host/Remote system.
ScriptChek Labels
Added support for the ScriptChek label, which
has 90% more printing space than a typical pharmacy label. This label
eliminates the need to purchase pre-printed labels. If you supply QS/1
with your logo in a PCL format, then QS/1 Label Support creates the label
with your store headers and the 4x6 card headings. Features of the new
label include:
Use text blocks which
vary from the typical straight line formatting. Instead of printing
straight across the label at a specified 'lines per vertical inch'
measurement, the left portion of the label can be printed in
one format and the right portion in a different format.
Rotate fields to print
vertically.
Justify lines to the
left, right or center.
Reprint information
that could only be printed once on previous labels. This includes
patient messages, drug messages, patient counseling messages, store
messages, compound ingredients, patient allergies, etc.
Print a section called
'Active Prescriptions' which lists all current prescriptions for the
patient.
Print a QR bar code
to direct a customer to a web site, a refill site or drug monograph
site.
Medicare
Eligibility
Added
fields to support E1 Medicare eligibility checking. These fields are returned
in the 504-F4 form Messaging field and include the LIS/LICS
level, effective and termination dates and the Medicare
plan type. This information displays on the Patient
Insurance Record and the ECS
eligibility response.
Label
Print Log Options
Added
an option, Create Label Printing Log, to Store Control/Label Options/Printing
Options. The following information is logged
when a label is printed or reprinted:
If the prescription
requires more than one label to print, only one entry of the label printing
is entered in the log. The log is available in customized reports and
data export.
Price
Plan Classification Code
Added
a payment type field, Classification
Code, to the Price
Plan/Additional Information screen. This field populates
on PMP reports generated through third party billing forms.
Accounts
Receivable Charges/Credits
Added
the ability to specify when to apply sales tax as part of the charge/credit
function. There are two new fields, Prompt for Sales Tax Charge and Prompt
for Sales Tax Credit on the A/R
Options, General Information screen. The default entry
for each field is unchecked. When checked, a prompt displays after the
amount field is entered during the 'add other transaction' function. The
prompts are Apply
Sales Tax Credit? and Apply
Sales Tax Charge?. Select No and a tax amount is not
added; select Yes and a tax amount is calculated and added to the transaction.
Added
the ability to enter an HME transaction number as a prescription number.
When the number is entered, the system searches the Prescription File
for the number. If it is not found there, the HME Transaction File is
searched. If the number is not located, RX/HME Record Not Found displays.
If the number is found, the item description, quantity, amount, discount,
tax and price from the HME Transaction File is populated for the A/R Charges/Credits
option.
Network
Printer Display
Updated
the printer selection box on Printer Configuration to display the maximum
number of printers available. The current limit of 51 printers is increased
to 90 (three system printers and 87 network printers).
RxTran
QS/1
has interfaced with RxTran to print Sigs in different languages for patients
with limited English proficiency. For more information, review the RxTran
topic or contact QS/1 Customer Support at 800.845.7558. NOTE:
If your pharmacy uses Spanish Sigs as the primary language today, you
will NOT be able to use the RxTran translation service. The languages
currently supported by RxTran include:
Arabic
Bengali
Chinese Simplified
Chinese Traditional
French
Greek
German
Haitian Creole
Hindi
Italian
Korean
Polish
Portuguese
Russian
Spanish
Tagalog
Vietnamese
To
better support multiple languages for Sigs, QS/1 now offers Architext
Warning Labels in multiple languages. These language selections are located
on the Patient
Record/Additional Information screen. Languages supported
by Architext are:
A
- Arabic
B
- Bengali
C
- Creole French
E
- English
F
- French (Canadian)
G
- French (European)
H
- Hindi
I
- Italian
J
- Japanese
K
- Korean
M
- Chinese Simplified
P
- Polish
Q
- Portuguese
R
- Russian
S
- Spanish
T
- Chinese Traditional
V
- Vietnamese (US)
HIPAA Privacy and Security
Rules (HITECH Act)
HIPAA standards require that customers are
offered the choice to opt in or opt out regarding the use of their PHI.
QS/1 added two options, PHI Participation and Marketing Participation,
to the Patient Record/Additional Info screen:
Opt in Data Collection
(PHI): If checked, customer information is used in data polling participation.
Default = Y (checked). This option refers to PHI not used for treatment
payment or operations, and the patient does not receive marketing
communication. The pharmacy does financially profit from rebates from
the distribution of the PHI. Current rebate services are Freedom Data,
IMS, Roche and Wolters Kluwer. Reconciliation services are not included
in this service.
Opt in Marketing (PHI):
If checked, customer receives marketing communications (mail, email,
fax or phone) through the use of their PHI by a third party or the
pharmacy. The pharmacy or third party receives financial compensation.
Default = N (unchecked). This option is greyed out if the QS1AUTH
option, Pharmacy First Formulary, is N. If the Opt in Marketing (PHI)
is changed from unchecked to checked, a Verification screen displays:
Both
these options are available in Batch File Updates and as Report Select,
Sort and Print Options.
Inventory/Drug Reorder Quantity
Added
the ability to control inventory ordering for different categories of
drugs. If a drug has a low turnover, or is very expensive, this function
allow pharmacies to order the drug only when necessary. The current method
for ordering inventory is to select drugs that have a minimum inventory
level set on the Drug Inventory screen. This new method is used to assign
certain drugs a minimum inventory level of zero. A flag is set so the
Automatic Drug Reorder program will select these drugs if the total on-hand
quantity drops below zero.
Added On-Demand Ordering and Committed
Qty fields on the Drug
Inventory Record. When the On-Demand Ordering field is checked,
the Automatic Drug Reorder program looks at the Quantity On-Hand and
Committed Quantity fields to determine order. If the Quantity On-Hand
field is less than zero and/or there is a Committed Qty, inventory
is ordered to bring the Quantity On-Hand back to zero and the Committed
Qty to zero.
Added Commit Inventory for Insufficient Supply
field to Store
Options/Inventory Options. This option is used to automatically
set the drug for ordering during InstantFill or when pending a prescription
in Workflow/Tickler if there is an insufficient quantity on-hand to
fill the prescription. The Store Option/Inventory Option is also used
in the Automatic Drug Reorder program to consider the committed quantity
on the Drug Inventory screen when ordering.
Added logic
to the Automatic Drug Reorder program to use the On-Demand Ordering
and Committed Qty fields on the Drug Inventory Record. A new default
Select Option, [Inventory].On-Demand Orders, allows drugs with a zero
Minimum Inventory Level to be reordered.
Added logic
to the Automatic Drug Receiving, Receive Wholesaler Reports to update
the Committed Qty field on the Drug Inventory Record when inventory
is received from the wholesaler.
Method
of Payment Priorities
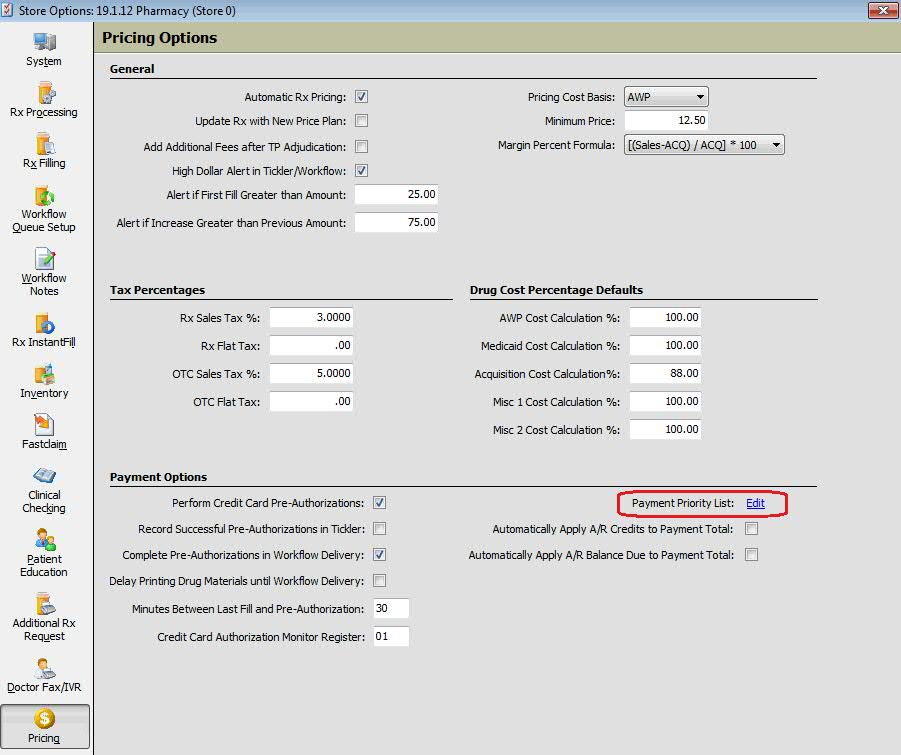
Added
a Payment
Priority List under Payment Options on the
Store Control/Store
Level Options/Pricing screen. Click Edit next to Payment
Priority List and the default list displays the current payment categories.
By default, the list includes FSA/HRA Cards, Payroll Deductions, Checks,
Credit Cards and Accounts Receivable. If a priority list has not been
determined for a patient, this list is used when payments are applied
to orders.
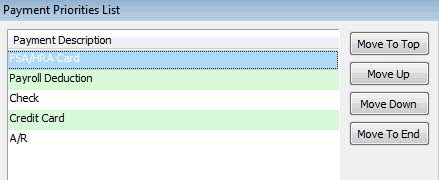
The Payment
Method Priority List is accessed and displayed on the Payment
Authorization screen on the Patient Record. Functionality
includes:
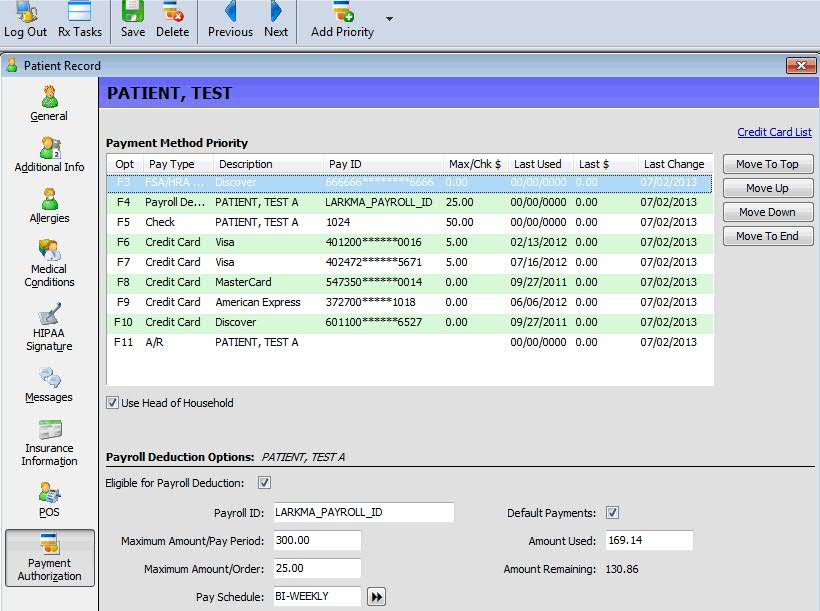
The grid at the
top of the screen can be toggled between the Priority Payment Methods
and the Credit Card List. The screen defaults to the payment method
and when toggling between credit cards and payment methods, the toolbar
option changes to Add Card or Add Priority, respectively. Both screens
have the delete function.
When the Payment
Method Priority List displays, the Head of Household option displays
at the bottom of the grid. Columns for the priority list include:
Pay Type, Description, Pay ID, Max/Chk Amt, Last Used, Last Amt and
Last Change.
For Credit Cards
and FSA/HRA cards, the Description is credit card type. The Pay ID
is the masked card number and the Max/Chk Amy is the maximum amount
the patient wants charged to the cards.
For the Payroll
Deduction Type, the patient name displays in the Description, the
payroll ID displays in the Pay ID and the maximum amount/order displays
in the Max/Chk Amt.
For the A/R Type,
the patient name displays in the Description and the Pay ID and Max/Chk
Amt columns are blank.
The Last Used column
displays the last date the payment method was actually used for a
payment. The Last $ column displays the last amount charged to the
payment method. NOTE: For checks, the Last $ is the total amount posted
against the check. The Last Change column displays the date of the
last change to the payment method. A date entered, and last modified
by, are stored with each payment method but do not display on the
grid.
The Add
Priority icon on the Payment Method Priority List
displays payment options when clicked. When a new method is added,
it is inserted according to the default list in Store Options. Payroll
Deduction and A/R Types are only listed once. Adding FSA/HRA and credit
cards displays a credit
card scan of the patient or head of household.
Adding a check displays
a New
Check window with the fields Check Number, Check
Amount and Amount Used. A check with an amount that has not been completely
spent cannot be deleted.
Added
Method of Payment Priorities to customized reports and exports.
Added
Payroll Deduction fields to Patient Data API call.
Added an API call for the Patient Payment
Priority List.
Assign
RetrieveRx Bag Colors by Workstation
Added
the ability to assign bag colors in RetrieveRx by workstation instead
of employee. Updates include:
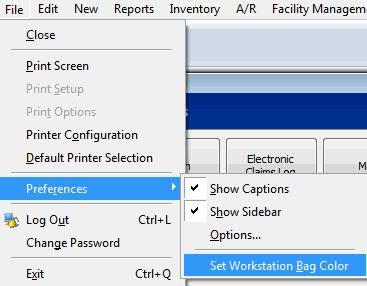
Added a menu option,
Set
Workstation Bag Color, to the File/Preferences
menu. If the system is not authorized for RetrieveRx this option does
not display.
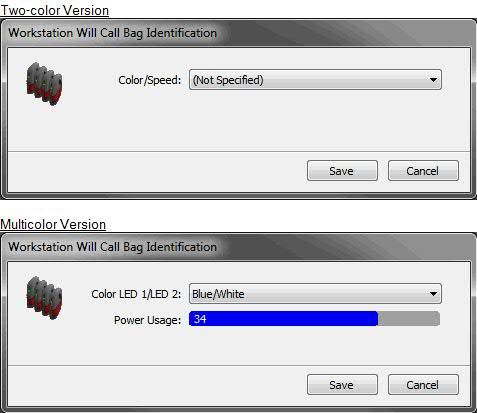
Created a new window
to view/edit Workstation
Will Call Bag Identification. If using the two-color
version, a color/speed drop down displays for selection. If using
the multi-color version, a drop down for the color of both LEDs displays.
A power usage meter displays how much battery power is used by each
color combination.
The system automatically
checks the following areas for workstations settings before using
employee settings:
Assign Location
Prescription
Status
Workflow Return
to Stock
Workflow Queues
Patient
Record/Use Head of Household Option
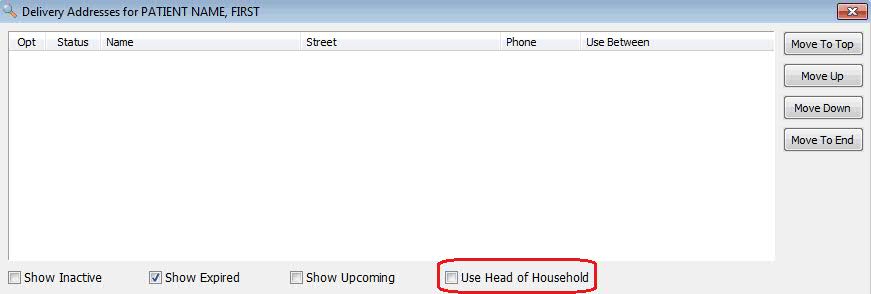
Added
the option, Use
Head of Household, to the Delivery Addresses window
to allow members of a household to use the head of household address.
If checked, this includes the head of household delivery addresses and
the main head of household address. If a Patient Record does not have
a head of household identified, this option does not display. When a new
address is created and Use Head of Household is checked, the new address
is added to the head of household list. Other functionality includes:
An option for head
of household members to allow the head of household access to their
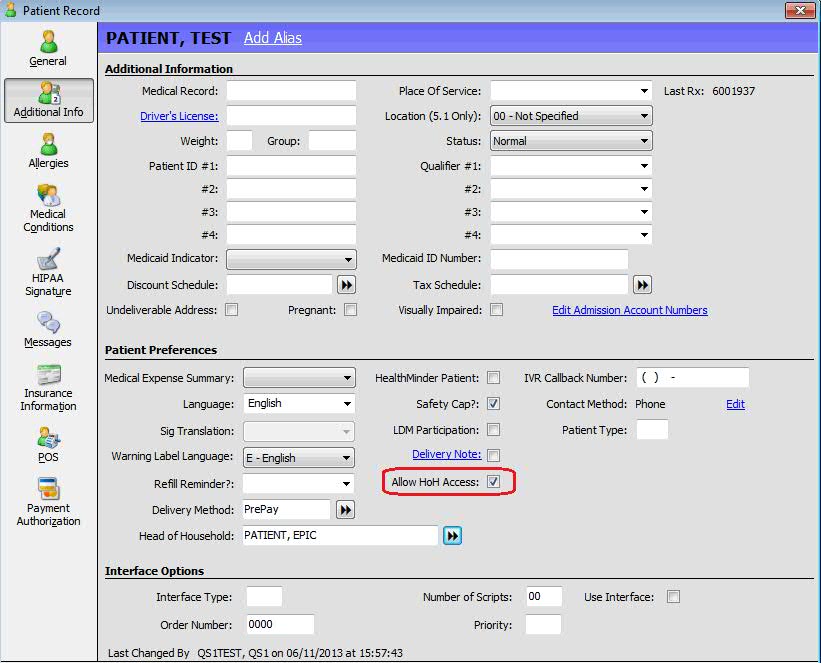
prescription profile. The Patient Record/Additional Info screen displays
the new field, Allow HoH Access,
under Patient Preferences. If the patient does not have a head of
household listed on the screen, this option is greyed out.
An option to set
the age
limit for dependents in Store Control/Store Level
Options/System Options. This option is primarily for use in splitting
batches if a dependent does not allow the head of household, or head
of household spouse, the ability to view their prescription profile.
If multiple patients are in a single batch with the dependent, the
prescriptions for the dependent are placed in their own batch so they
are separated for invoices, routing slips and shipping. If the dependent
is over the age limit, but allows access to the head of household,
continue to combine batches with others in the household.
Linked head of household
to view patient dependent list. When a head of household is connected
to a patient, the patient displays on the dependent list. Likewise,
when a patient is added to a dependent list, the head of household
populates on the Patient Record.
IVR
Outbound Text/Email by Patient Name
Added
the ability to send outbound IVR text and email messages by patient name.
Each text
and email has its own template ID number and requires a new IVR script.
Contact QS/1 IVR Support at 800.845.7558, ext 1421, to request the
script. When the updated script is loaded, populate the Call Out Version
field on the Store
Control/Store Level Options/Doctor Fax/IVR screen
with 1.3.0.34 or higher. New options in Store Control/Store Level Options/Doctor
Fax/IVR includes:
Added a Call Out
Version text box. If the value in this field is 1.3.0.34 or higher
the new call types display.
Added Use Email/Text
Business Days with a check box and a combo box listing days of the
week
Added Use Email/Text
Business Hours with a check box and text boxes for the times (from
and to)
Added a Use Email/Text
Web site with a check box and a text box for up to 30 characters
Added a Ship Ground
and Ship Next Day combo box with the following call types: Phone Only,
Text Only, Email Only and Patient Contact Method
The Shipping
Priority of the batch determines which Store Level
Option applies after a tracking number is received
If a Phone call
type is created the existing
IVR hierarchy is used
If a Text or Email
call type is created, and the Patient Record does not define a cell
phone number or email address, a call will not be performed
Ship Ground and
Ship Next Day IVR Outbound call messages are created automatically
when the batch receives a tracking number
The Call Out Queue
- Call
Messages list displays the new types
Added the option
to select a patient name when adding a call to the
Call Out Queue
and reworded the headings on the screen to support the patient name
lookup
Business
days will be abbreviated and business
hours will be abbreviated to hours only
High cost is sent
as $xxx (whole number)
Return to NRx
Enhancements Archive


 Type your drop-down
text here.
Type your drop-down
text here.