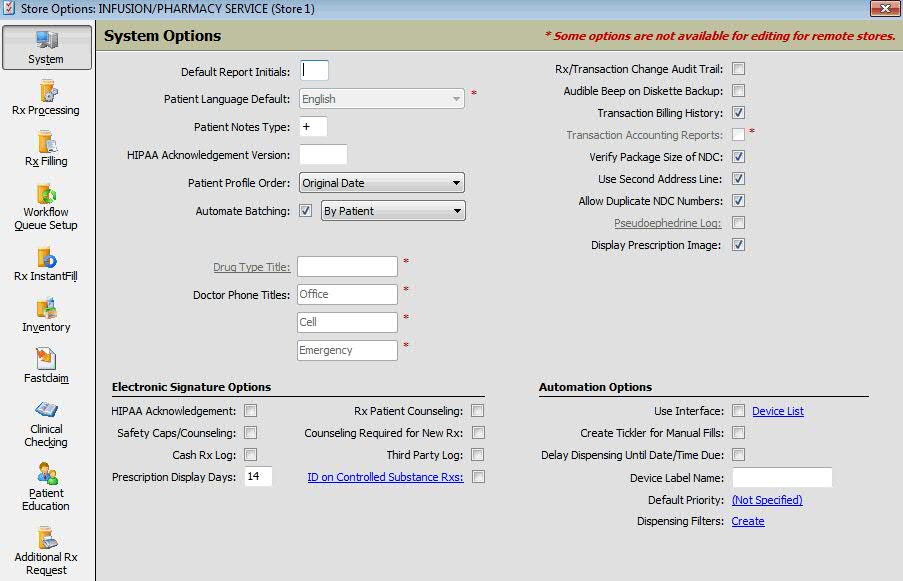
To access Store Level Options/System Options:
1. Click Store Control, Store Level Options. The following window displays:
 Some System Options are not available for remote
stores. Those options are marked on the remote
store's screen and a message displays on the title
bar.
Some System Options are not available for remote
stores. Those options are marked on the remote
store's screen and a message displays on the title
bar.
2. Use the definitions below to determine how to set the options:
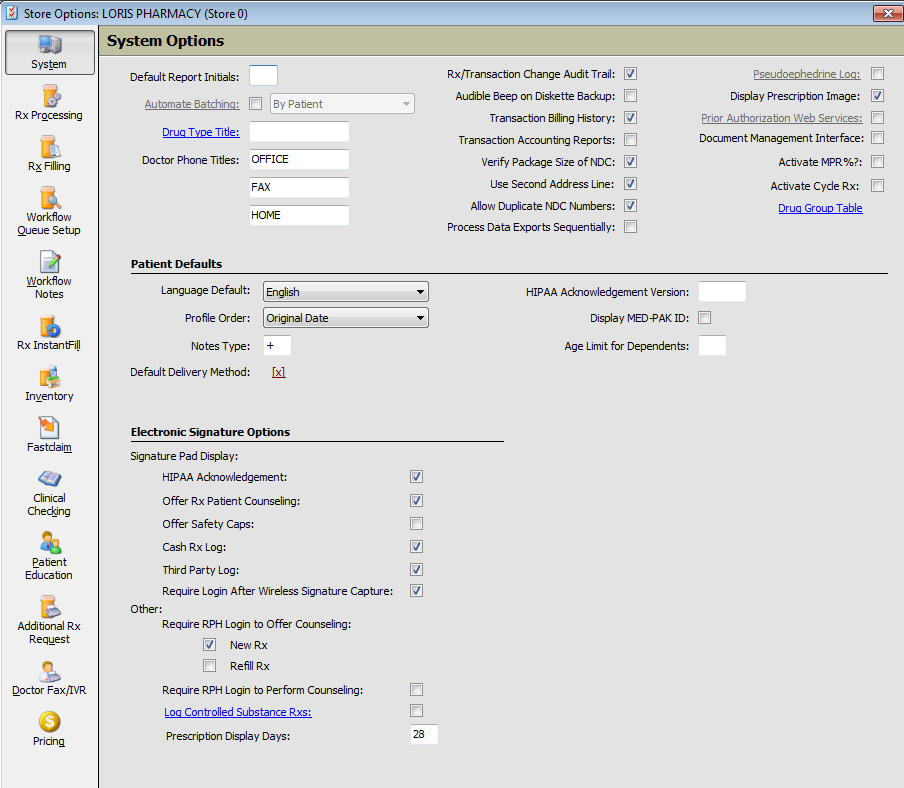
| STORE CONTROL | |
| STORE LEVEL OPTIONS/SYSTEM | |
| Field Name | Field Definition |
| Default Report Initials | Type the initials of the default pharmacist for reports. |
| Automate Batching | Check this option and the system automatically creates a batch when multiple prescriptions are entered for the same patient on the same day. |
| Drug
Type Title
|
Click Drug Type Title to display the Drug Type Table. Type the drug type and description; click Add. |
| Doctor
Phone Titles
|
Type up to three phone number fields to display on the Doctor Record (Office, Home, Fax, Mobile, Hospital). |
| Rx & Transaction Change Audit Trail | Check this option to keep a log of changes made to the prescription and transaction records. The Rx Transaction Change Log Report in the Prescription Log sub-menu prints a list of changes made to these records. |
| Audible Beep on Diskette Backup | Check this option to produce an audible beep during a backup procedure to indicate a diskette is full. |
| Transaction Billing History | Check this option to track the billing history of transactions. |
| Transaction Accounting Reports | Check this option to track transaction revenue adjustment values. |
| Verify Package Size of NDC | Check this option to verify all 11 digits of the NDC during NDC verification. If left unchecked, only the first 9 digits of the NDC are verified. |
| Use Second Address Line | Check this option to use a second address line on the Patient Record. |
| Allow Duplicate NDC Numbers | Check this option to allow drugs to contain the same NDC number. |
| Process Data Exports Sequentially | Check this option to complete data exports individually in sequential order. Note: Must be authorized for data exports to use this option. |
| Pseudoephedrine Log | The customer must be signed up with MethCheckRx to use this option. If they are, and the box is checked, the customer is linked to the MethCheckRx web site to track use of Pseudoephedrine. |
| Display Prescription Image | There are three scenarios for this option: • Leave unchecked and if an image is available, the message ‘Image is Available’ displays. Click on the link to display the image. • Check this option and if an image less than 100KB is available, the image displays as normal. • Check this option and if an image greater than 100KB is available, the message ‘Image is Available’ displays. Click on the link to display the image. |
| Prior Authorization Web Services | Check Prior Authorization Web Services and then click the link. The Log In ID and Password window for CoverMyMeds (CMM) displays. Type the ID and Password created for CMM. This enables the Test Web Service option. When clicked, QS/1 sends a test request to CMM to verify connectivity. To add requests to Tickler, check Add Prior Authorization Web Requests to Tickler. Click Save. |
| Document Management Interface | Check this option if using an interface to manage required patient documentation. If authorized for QDM, click the link to access the Document Management Interface Options screen. |
| Activate MPR% | The MPR% refers to the Medication Possession Ratio which measures the percentage of time a patient has access to medication. When Activate MPR% is checked, the MPR% displays on the Patient Record, the Rx MPR% and Patient MPR% display on the Rx Summary screen and a Calculate option displays on the Rx Profile. |
| Activate Cycle Rx | The Activate Cycle Rx? field refers to activating the fields necessary to run the Adherence Report and process Prescription Cycle functions. |
| Drug Group Table | Click the link to access table to define drug groups and add descriptions. Note: If the Send box is checked and the pharmacy is authorized for Asembia1 or Diplomat®, prescriptions for drugs with that Drug Group Code are sent to Specialty Pharmacy Services. |
| Patient Defaults | |
| Language Default | Select the patient language preference for SIGs from the drop-down list. |
| Profile Order | Select the order to view Patient Profiles from the drop-down. Options are Original Date, Last Fill Date and Active. |
| Notes Type | One-character field is used to distinguish the type notes you enter into the system. |
| Default Delivery Method | This option is store specific. When a new patient is added to the system, the Delivery Method on the Patient Record/Additional Information screen defaults to the option selected in Store Options. However, the method on the Patient Record can be changed. |
| HIPAA Acknowledgement Version | If you create your own privacy policy notice, give the notice a version number and type that number here (ex: 0001). |
| Display MED-PAK ID | Alaska Customers Only. |
| Electronic Signature Options | |
| HIPAA Acknowledgement | Check this option and the signature device prompts for a signature for the privacy notice when patient is signing for other transactions. |
| Safety Caps/Counseling | Check this option and the signature device prompts for a signature if patient accepts/declines counseling and also if they prefer safety caps. |
| Cash Rx Log | Check this option to prompt for a signature for cash transactions. |
| Prescription Display Days | Type the number of days to display prescriptions requiring a signature. |
| Rx Patient Counseling | Check this option and if the Rx being signed for is new, the system prompts for the Pharmacist User ID and Password before the signature can be completed. |
| Require RPH Login to Offer Counseling | New
Rx: Check to prompt the pharmacist login to log offering counseling
for new Rxs.
Refill Rx: Check to prompt the pharmacist login to log offering counseling for refills Rxs. |
| Third Party Log | Check this option to prompt for a signature for third party transactions. |
| Log Controlled Substance Rxs | Check this option to display the Controlled Substance Options window. Check each drug class if ID is required at check out for that drug. Check each type of Required Customer ID Information required. Check each option under More options if required at checkout. |
| Require Login After Wireless Signature Capture | Check this option and the system prompts for login after capturing wire signature. An employee must have security access to control access to the wireless signature capture program. If you have multiple systems, enabling this option in Point-of-Sale enables it in NRx and SystemOne and vice-versa. |