Posting payments based on the remittance from the third party or Medicaid is the first step in the reconciliation process. There are two options for posting payments, manual or auto post. If a claim is rejected by the third party or Medicaid, that claim can be posted as Rejected in the Paid column and does not post a paid date on the transaction.
To manually post payments:
Manual Posting is divided between primary, secondary and tertiary carriers so payments are posted to the appropriate section on the Transaction Record.
1. Access PrimeCare.
2. Click
System Utilities. Select Reconciliation, Manual Payment Posting (Presorted). Click Primary,
Secondary or Tertiary.
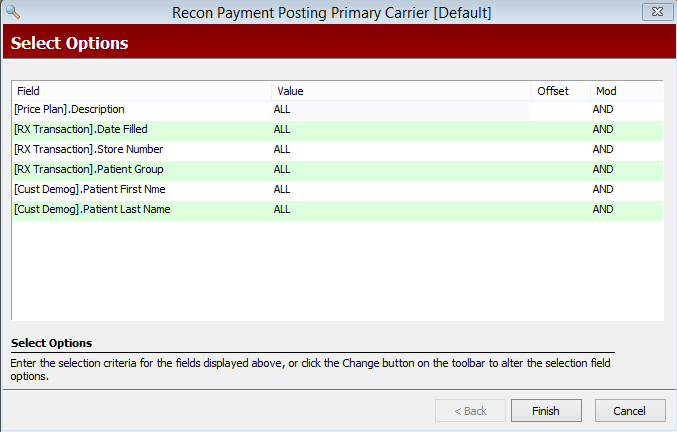
Select Options display:
3. The most commonly selected options are:
[Price Plan] Description: Referring to the remittance to be posted, type the name of the Price Plan in single quotes.
[Rx Transaction] Date Filled: Type the date, or date range, for the claims on the remittance.
[Rx Transaction] Store Number: Type the store number for which you are posting if this is a Host/Remote System.
4. When Select Options are complete, click
 . Reconciliation Options display:
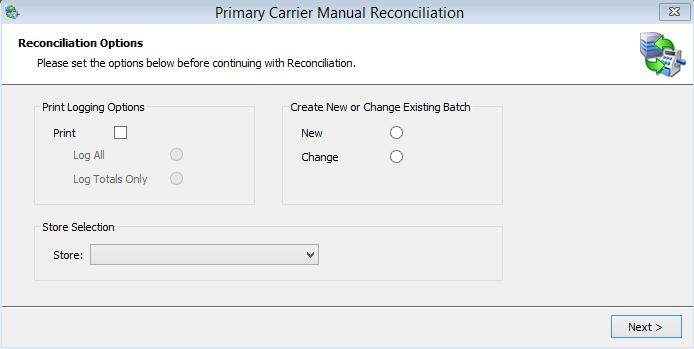
5. Options are:
Print Logging Options: Check Print if printing a log of the session. Check Log All to print each line item. Check Log Totals Only to print totals only.
 When running reconciliation, if you select to print
line items or details, the printer selected displays 'Busy' until reconciliation
is complete.
When running reconciliation, if you select to print
line items or details, the printer selected displays 'Busy' until reconciliation
is complete.
Create New or Change Existing Batch: Check New when posting new payments. Check Change if posting changes.
Store Selection: This option is only available if your system is a Host/Remote. If a Host/Remote, select store for this reconciliation from the drop-down.
6. When Reconciliation Options are complete, click  .
Transaction Posting displays:
.
Transaction Posting displays:
![]()
7. Type the Date, Rx Number and Amount. Press ENTER
to display the first transaction to post:
![]()
8. If the Amount Paid is the Same as
the Amount Expected, press ENTER
or click ![]() .
.
9. If the Amount Paid is Different
from the Amount Expected, type the amount paid in the Amount field.
Press ENTER or click ![]() .
.
10. If the third party or Medicaid refuses the claim, click ![]() .
Reject displays in the Paid column
and a paid date is not posted on the transaction. When running the Reconciliation
Report, there is a Print Option to add Rejects to the report.
.
Reject displays in the Paid column
and a paid date is not posted on the transaction. When running the Reconciliation
Report, there is a Print Option to add Rejects to the report.
11. If you need to override an erroneous
amount from a previously posted transaction, select the New option
on the Reconciliation Options screen. Type the Date, Rx Number and Amount
under the Manual Posting section on the Transaction Posting screen and
click ![]() .
.
12. To move to the next claim, click ![]() .
.
13. Repeat these posting steps until the message End of File displays in the lower section of the screen.
14. Click X in the upper right corner of the window, or press ESC, to close the reconciliation process.
To automatically post payments:
The other option for posting payments is Auto Post. Use Auto Post if you decide not to manually post payments for each individual transaction.
Please
note that if you use this feature, ALL transactions within the selected
criteria will be auto posted. For example, if posting payments for PCS
within a specific date range, ALL transactions found for PCS within that
date range will automatically post with the amount adjudicated (amount
the third party indicates they will pay) to the Amount field on the Transaction.
To Auto
Post claims, follow Steps 1 through 7 above. When the first transaction
to post displays, click ![]() .
.
Return to Electronic Claims Reconciliation Overview