Updated the system to provide more specialization for delivery setup and robust capability for sending Delivery Sheets to DeliveryTrack.
Quick Tips for Setup/Use of new DeliveryTrack Features:
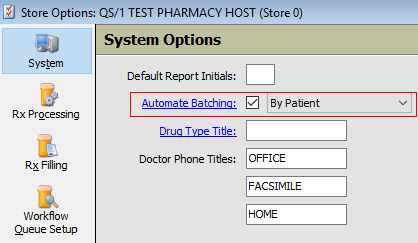
If Automate Batching is turned on: Separate Tote feature is disabled. Orders display on the Assign Tote screen as soon as they are entered. The Rx Number field displays the status of the order similar to the way it does in the Batch scan.
One route must be added for the Delivery button to display under Rx Processing Tasks.
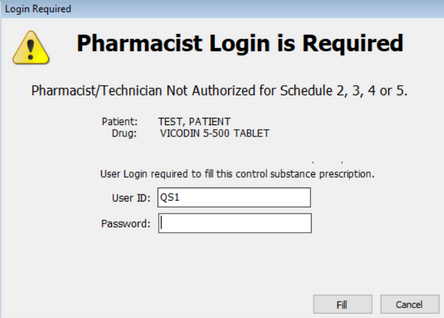
DeliveryTrack must be authorized to use the Resubmit and Reopen features.
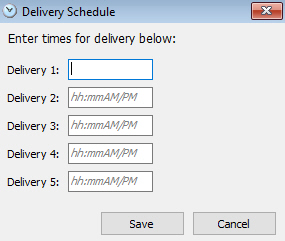
A Delivery Schedule must be attached to a Delivery Route for the route to display on the Facility Record as an option.
To perform a delete function on any of the new screens for Routes, Stops, and Schedules, rename or replace them.
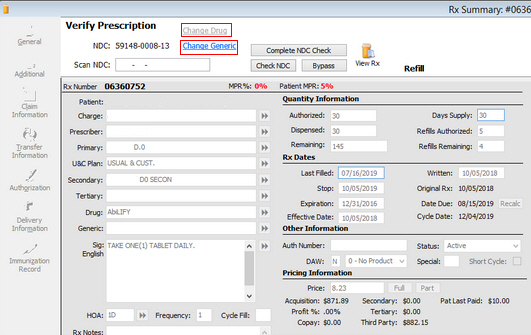
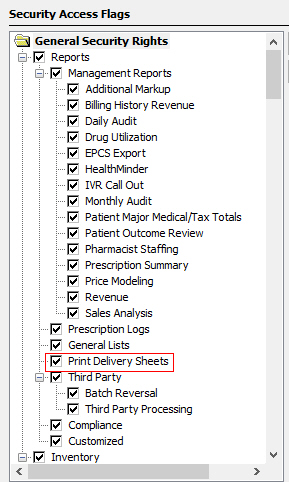
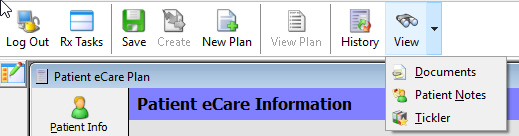
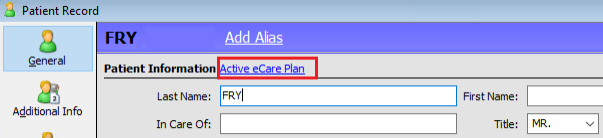
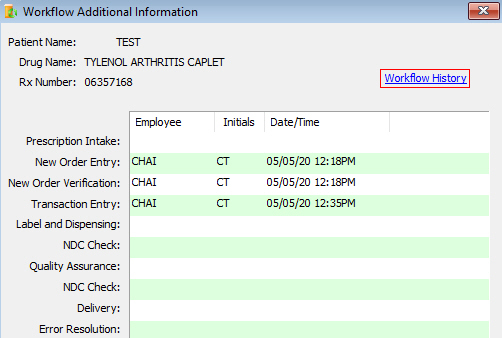
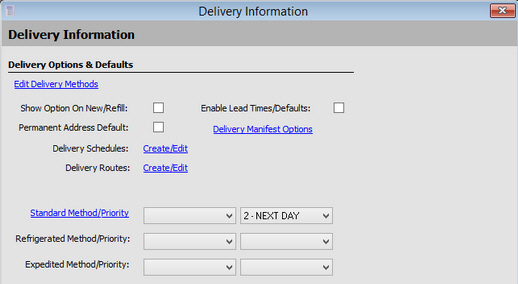
Store Control/Delivery Information
Added menu option, Delivery
Information, under Store Control > Store Level Options. Click to
access the Delivery
Information screen to maintain Delivery Options
and Defaults. The section was moved from Store Control > Rx Filling.
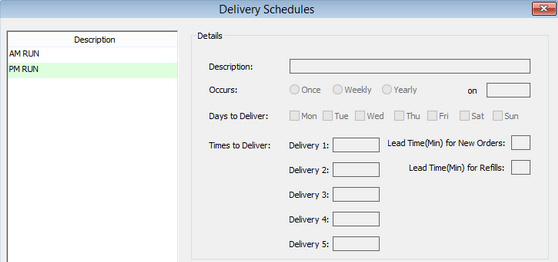
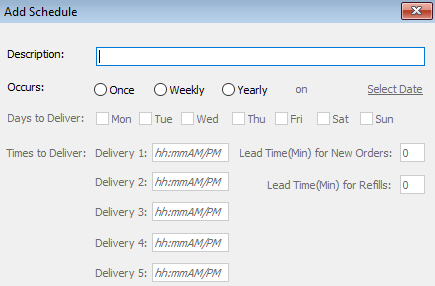
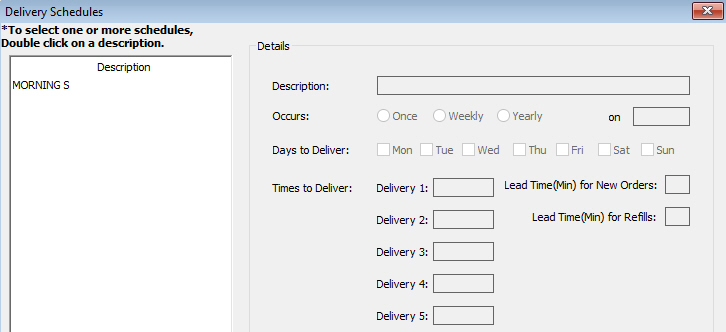
Delivery Schedules - New Screen
Added a
Delivery
Schedules screen to include: Description, Days
to Deliver, Times to Deliver, Lead Time for New Orders, and Lead Time
for Refills.
To access, select the Create/Edit hyperlink next to the Delivery Schedules
field on the Delivery Information screen.
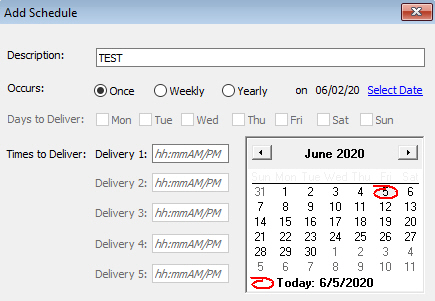
Add Schedule - New Screen
To add a schedule, select Add at the top of the Delivery Schedules
screen to access the Add
Schedule screen. Enter the Description, Occurs
(Select
Date hyperlink), Days, and Times to Deliver. Note: Description, Occurs, and Times to Deliver
are required to save a schedule.
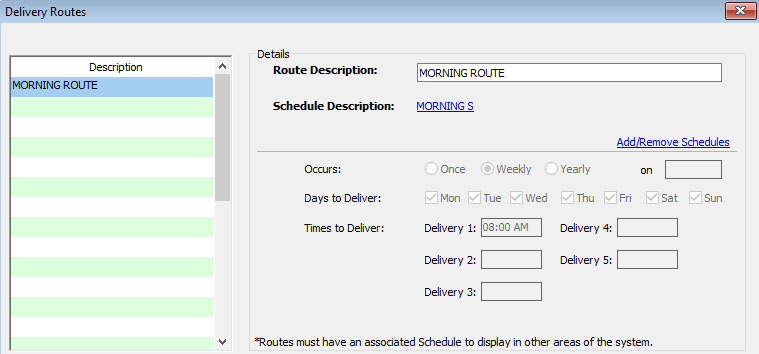
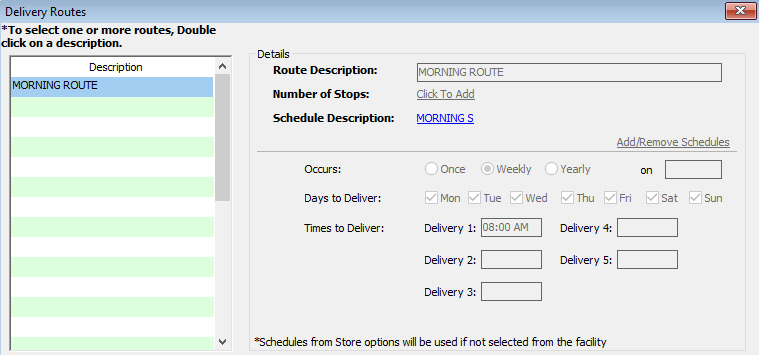
Delivery Routes - New Screen
Added a Delivery Routes
screen to include: Description, Route Description, Schedule Description,
Number of Stops (facility only), Occurs, Days to Deliver, Times to
Deliver, and Add/Remove Schedules hyperlink.
To access, select the Create/Edit hyperlink next to the Delivery Routes
field. Enter up to 999 routes.
To add a Description, click inside
an empty Description field, or click Add.
Once a Description is added, the Save button is enabled. Once a Route
Description is entered and saved, the Schedule
Description link is enabled.
To attach a schedule, select the Click to Add
hyperlink. The schedule displays in bold. Once the schedule is selected,
the schedule displays in the bottom portion of the Delivery Routes
screen.
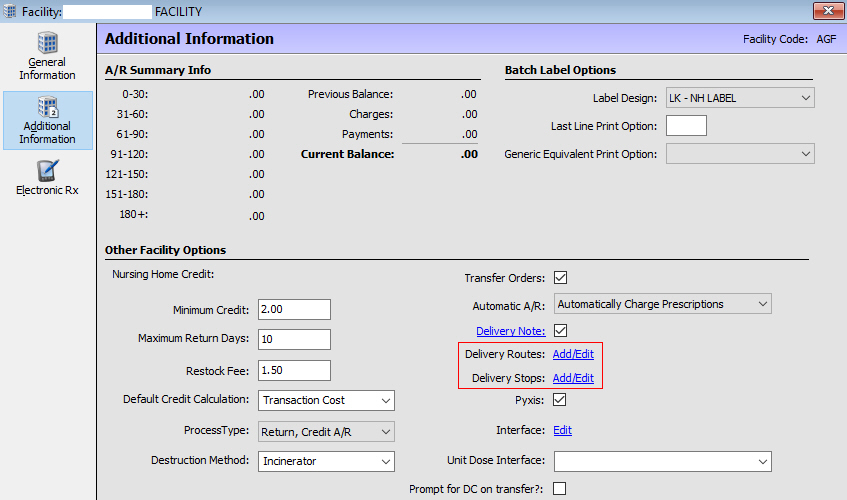
Facility Record
Added the ability to set up and add Delivery Routes and Stops for facilities. Added fields, Delivery Routes and Delivery Stops in the Check Delivery Sheet section on the Facility Record > Workflow Options screen.
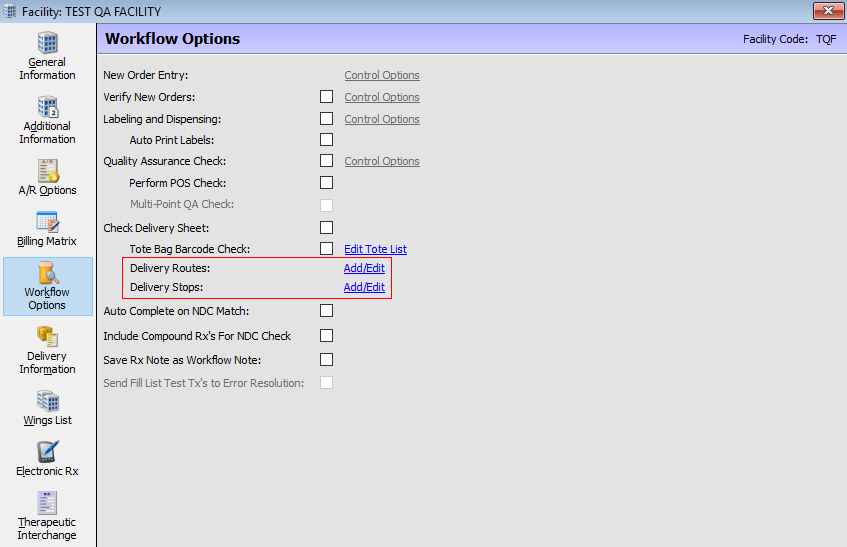
Workflow Options Screen
Delivery
Routes - New Screen
Select the Add/Edit hyperlink to manage the Description,
Route Description, Schedule Description, Occurs, Days to Deliver,
and Times to Deliver.
Double click a Delivery Route and
the route displays in bold. The Number of Stops screen is then enabled.
Number of Stops - Select the Click
to Add hyperlink and the Delivery
Stops screen displays. Double click the stop(s) needed. A stop displays
in bold if double clicked.
Schedule Description - Editable
field. Select the Click to Add
hyperlink and the Delivery Schedule screen displays. Double click
the schedule(s) needed. Schedules display in bold if double clicked.
Delivery Schedules must be added under Store Level Options. Routes
must have an assigned schedule in order to display under the Facility.
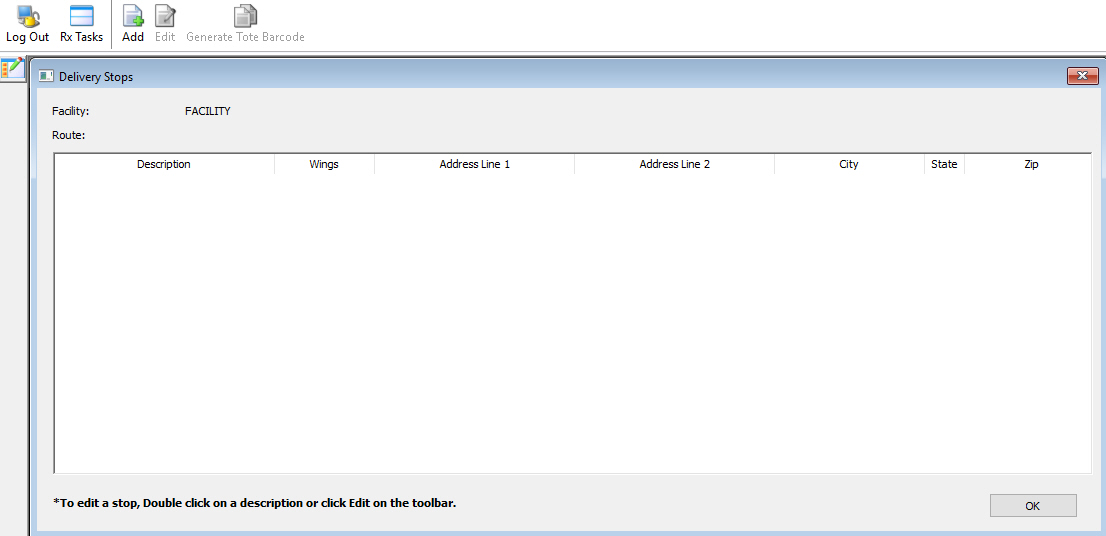
Delivery
Stops - New Screen
Select the Add/Edit hyperlink to manage Facility (non editable)
Route, Description, Wings, Address Line 1, Address Line 2, City, State,
and Zip. To add a new stop, select Add
from the top of the Delivery Stops screen.
Add up to 999 stops. Once a stop
is entered, the Edit button is activated. To edit, highlight a Delivery
Stop and click Edit. If delivery stops are accessed from
the Delivery Route screen (Number of Stops link), the Generate Tote
Barcode is the only option available.
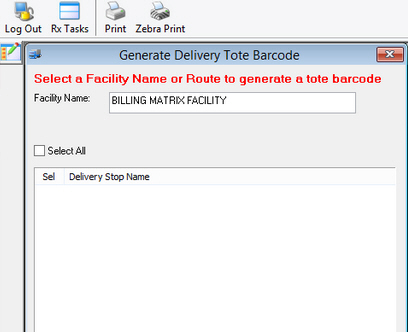
Generate
Tote Barcode - New Screen
Select the Generate Tote
Barcode button from the Delivery
Stops screen. Select stops to print tote barcodes.
Add Stop - New Screen

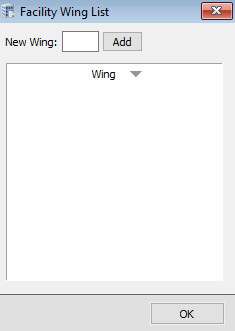
To add a stop, select Add from the top of the Delivery Stops screen to manage Name, Wing List, and Address information. A Name must be entered before Save is activated. Select the Create hyperlink to add a Wing. Choose a wing from the Facility Wing List, or type a new one and click Add. Once a wing has been added, the Create hyperlink changes to the number of wings that were added to the stop.
Delivery Information Screen - New Screen
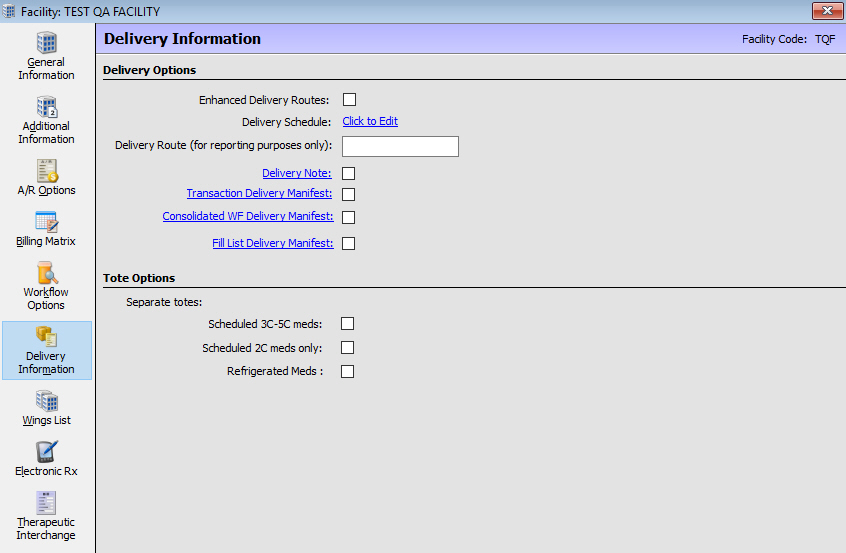
Select the Delivery Information icon on the vertical icon bar to access and maintain: Enhanced Delivery Routes, Delivery Schedule, Delivery Route, Delivery Note, Transaction Delivery Manifest, Consolidated WF Delivery Sheets, Fill List Delivery Manifest, as well as Tote Options for Scheduled 3C-5C meds, Scheduled 2C meds only, and Refrigerated Meds. All options default to unchecked.
Select the Enhanced Delivery Routes option to create a enhanced Delivery Schedule when the Delivery Schedule hyperlink is selected. Leave unchecked for a regular Delivery Schedule.
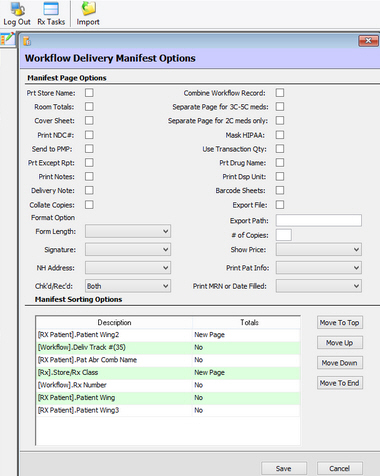
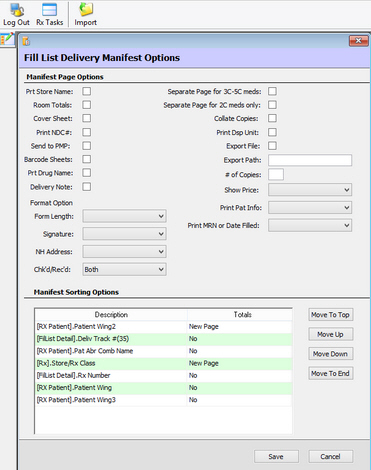
Manifests
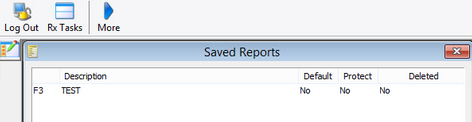
The manifests below are available from the Delivery Information screen. Select the Import button to access the Saved Reports screen. The items in the Manifest Sort Options window are sortable by any options in bold. The Delivery Manifest Options used are pulled from the option settings in Store Control > Store Level Options > Delivery Information. If a patient is not in a facility, the system uses the Delivery Manifest Options under Store Control > Store Level Options > Delivery Information.
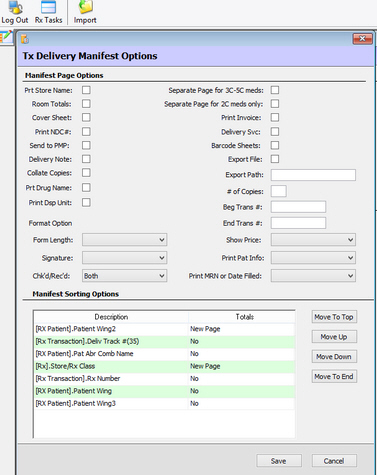
Consolidated WF Delivery Manifest
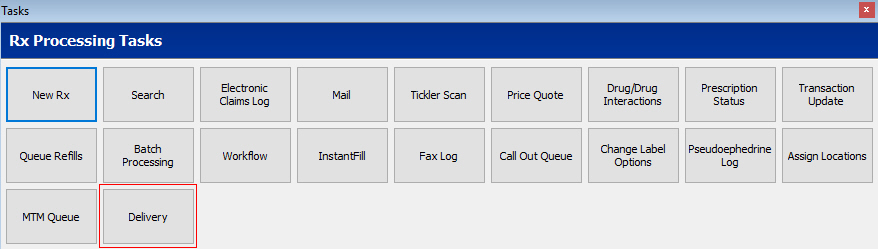
Delivery Queue - Rx Processing Tasks
Added a button, Delivery, to Rx Processing Tasks. This option is available if Delivery Route is selected on the Facility Record. Select to access the following:
Assign Tote
The Assign Tote screen provides the following details: Delivery Route, Facility Name, Patient, Group, Drug, Rx Number, Batch, Due Date/Time. Sort by Due Date/Time, Patient, or Delivery Route.
Only items that have a Delivery Schedule and Route display. Items that do not can be accessed in the Packaged Prescriptions for Delivery queue via the Workflow button in Rx Processing Tasks > Delivery. One route must be set up in order to use the Assign Tote feature.
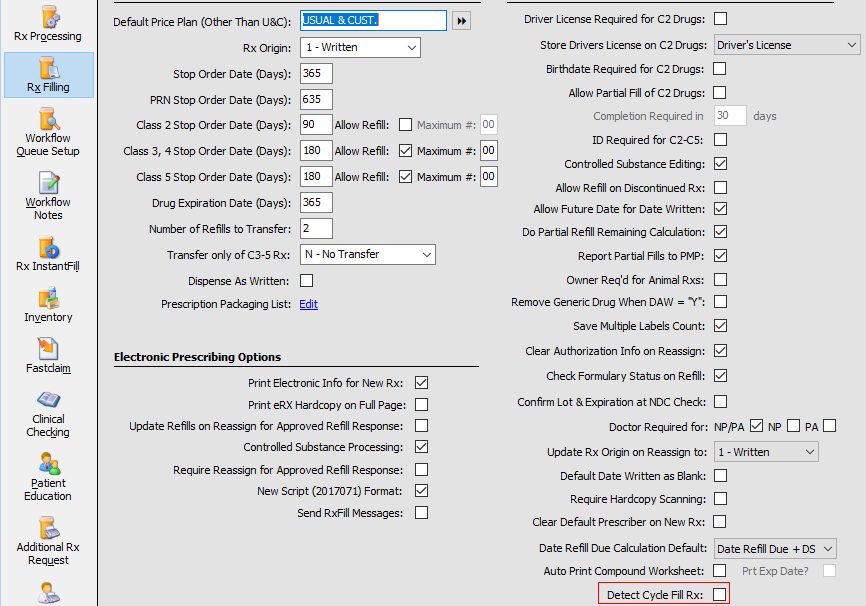
Notes: If DeliveryTrack and Delivery Web Service authorizations are on, the Delivery Queue is available. If DeliveryTrack and Delivery Web Services are not authorized, the Delivery Queue can still be used if at least one delivery route is set up in Store Control > Store Level Options > Delivery Information. Delivery Records are created even if Workflow is not turned on. If Workflow Delivery is not turned on in Store Control > Store Level Options > Workflow Queue Setup, then the Delivery Queue only displays items that have the Method field on the Prescription > Delivery Information screen set to Delivery or Stat. If Workflow Delivery is turned on in Store Control > Store Level Options > Workflow Queue Setup, then the Delivery Queue only displays items that have the Method field on the Prescription > Delivery Information screen set to Delivery or Stat, and the regular Delivery Queue displays all else.
Existing Tote Bag Barcode
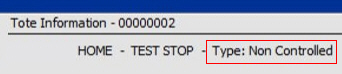
If Tote Bag Barcode is selected on the Facility Record > Workflow Options, the prescription or tote can be scanned first. If the tote is scanned, the tote information displays under Tote Information on the Assign Tote screen. If Tote Bag Barcode is not checked, a Wing List must be set up for each stop. If an unassigned tote is scanned, the message, Facility Name, Route Name and Type (Controlled or Non-Controlled), displays. The tote is assigned once a prescription is scanned. If a prescription is not scanned to that tote, the tote is unassigned.
Scanning Barcodes
Scan the tote first and then either scan or enter the prescription label or batch barcode. Otherwise, an error, Invalid Tote - Please scan a valid tote barcode and try again, displays.
Once a tote is scanned, the coinciding information displays in the Tote Information section at the top. If a tote that is unassigned is scanned, the message, Tote unassigned - Ready to scan Rx Label, displays. The tote becomes assigned once a prescription is scanned. If a prescription is not scanned to that tote, the tote is unassigned. A prescription can then be scanned and if the patient is in the correct delivery route, a good beep sounds and the order is moved from the bottom section of the Assign Tote screen to the Open Delivery Sheets screen and the following displays under the Tote Information section: Tote - assigned - Facility Name. Delivery - Delivery Date/Time.
If a tote is scanned and a tote is already open for the coinciding route, a bad beep sounds and the message, Tote already open for this route -- Are you sure you want to create a new tote?, displays. Select Yes, and the Assign Tote screen displays with Tote Information: Read to scan Rx Label. Select No, and the Assign Tote screen displays with the tote information assigned to the facility.
If a barcode that is linked to a tote is already closed, the message, Tote linked to a previously closed tote. Please reopen the delivery sheet or generate a new tote barcode and try again, displays.
The tote barcode is the Delivery Route and when scanned from the Assign Tote screen, the batch or prescription that needs to go in that tote must match the barcode for the route.
Depending on what was initially scanned, the prescription cannot be scanned if it is a part of a different route. A message, Invalid barcode - Please scan prescriptions that belong to this route, displays.
Separate Tote Options
The following occurs if any of the Separate tote options are selected under Facility Record > Delivery Information > Tote Options.
When a tote is scanned, the Type is identified.
A message displays if using separate tote options are selected under Facility Record > Delivery Information > Tote Options if the wrong type is scanned for a particular tote. Example: This message displays if a controlled prescription is scanned for a non-controlled tote.

Added a window, Generate Delivery Tote Barcode, available from Rx Processing Tasks (Delivery button) > Utilities > Generate Tote Barcode. Double click to select a Facility Name. Tote barcodes can be printed from the screen that displays.

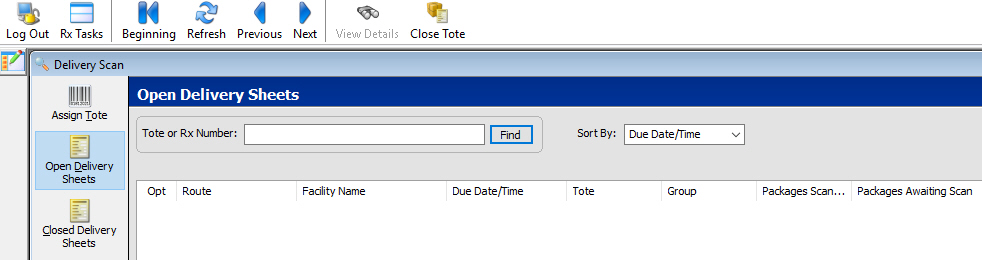
Open Delivery Sheets
The Open Delivery Sheets screen provides the following details for open items: Route, Facility Name, Due Date/Time, Totes, Group, Packages Scanned, and Packages awaiting Scan. It can be sorted by Due Date/Time or Delivery Route.
Select the Close Tote button to print the Delivery Sheet and send it to DeliveryTrack. It is then moved to the Closed Delivery Sheets screen (if DeliveryTrack is authorized).
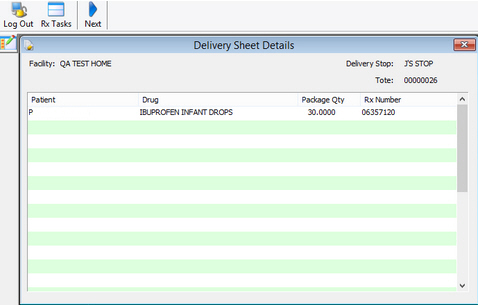
Select the View Details button to access the Delivery Sheet Details screen to view the following for items scanned from the Assign Tote screen: Facility, Patient, Description, Delivery Stop, Tote Number, Package Qty, Route, and Rx Number.
Closed Delivery Sheets
The Closed Delivery Sheets screen provides the following details for closed items: Route, Facility Name, Due Date/Time, Totes, Group, and Packages Scanned. It can be sorted by Due Date/Time or Delivery Route.
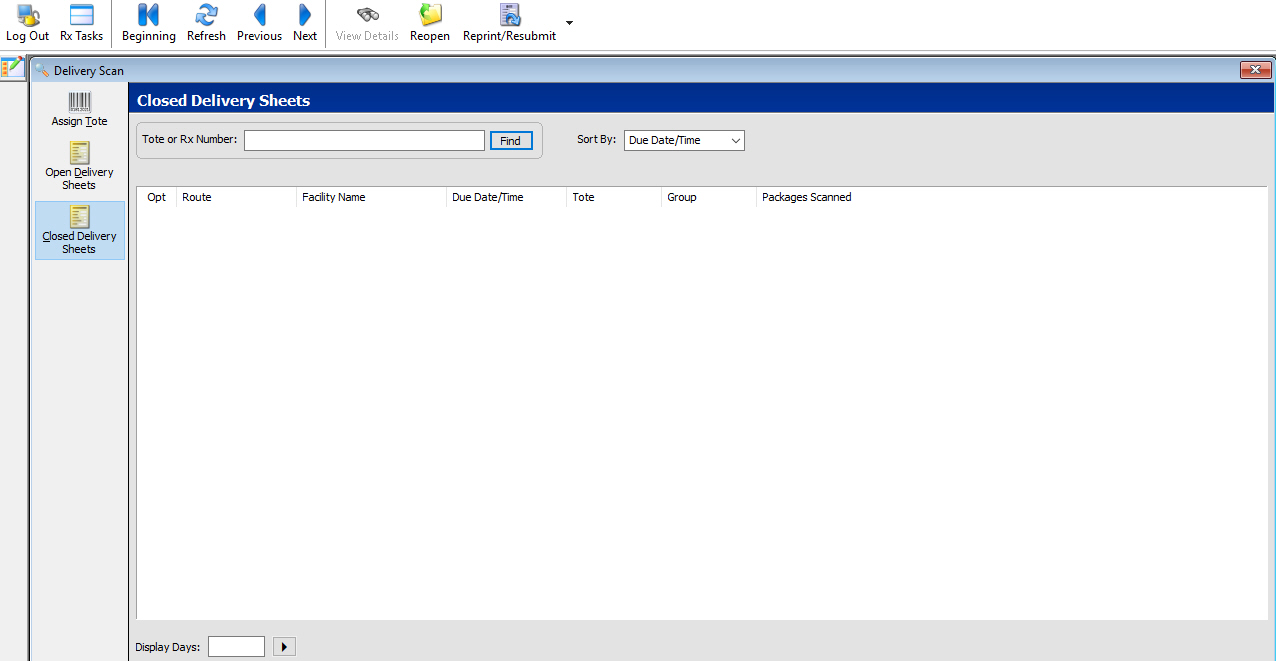
Reopen
Select Reopen and the system queries DeliveryTrack (If authorized) to check the status. If the status is Out for Delivery or Scan to Route, the message, Out for Delivery - can't reopen delivery sheet, displays. If the status is neither of these, the system sends a delete message to DeliveryTrack. The Delivery Sheet is then returned to the Open Delivery Sheet Queue. An order can then be added and set to go out on the next run or removed if the facility cancelled it at the last minute.
If not authorized for DeliveryTrack, the Reopen and Reprint/Resubmit options are not enabled.
Reprint/Resubmit
Select the down arrow in the Reprint/Resubmit button and select Reprint to reprint the Delivery Sheet. Or, select the Reprint/Resubmit option and the Delivery Sheet prints. If authorized for DeliveryTrack, the system resends all items on the Delivery Sheet to DeliveryTrack.
Use the buttons at the top to reopen, reprint, or resubmit items.
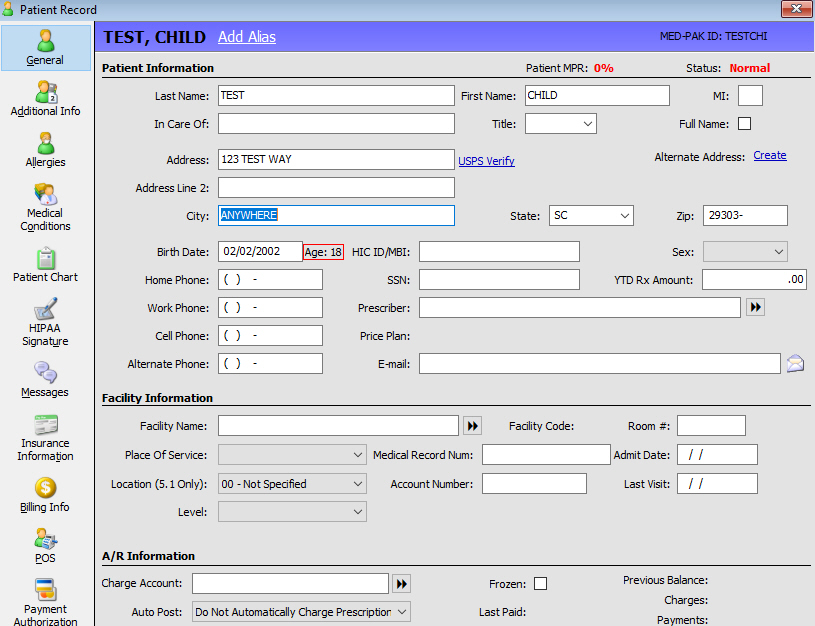
Patient Record
Added a field, Delivery Method, to the Patient Record > Additional Information screen. If set to Delivery or Stat, the edit hyperlink is accessible. Click Edit and the Delivery Options window displays.
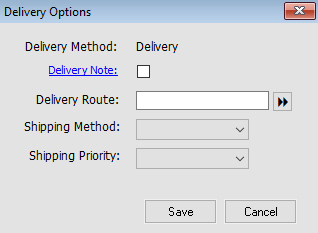
Delivery Options
Access the Delivery Options screen for the following: Delivery Note: Default = Unchecked. Anything entered on the Patient Record > Additional Info > Delivery Note field defaults here. Delivery Route: Default = blank. If the Facility has one route, any new patients default to that route. If a patient is in a facility and the chevron is selected, the Facility's routes display. If the patient is not in a facility and the chevron is selected, the routes from Store Level Options display. Shipping Method: Default = blank. Options include 1 - NDA, 2 - Ground, and 3 - 2DAY. Shipping Priority: Default = blank. Options include: 1 - Daily and 2 - Next Day.
Delivery Route
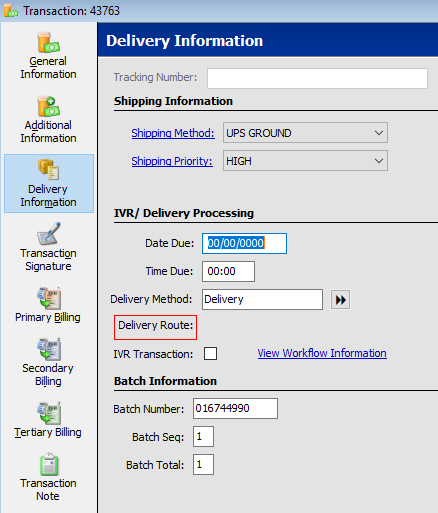
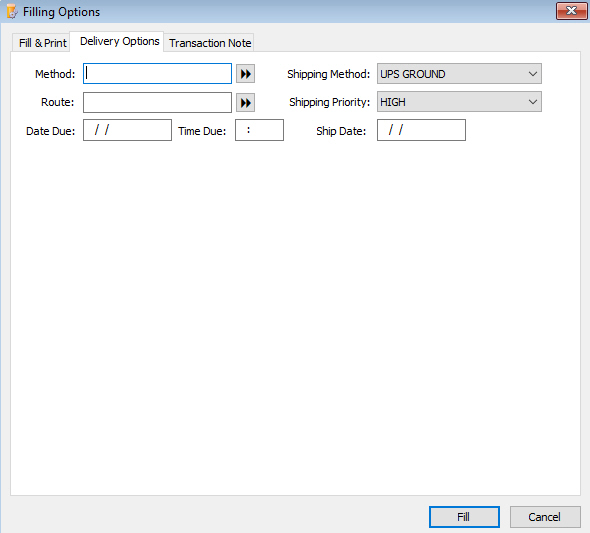
Added a Delivery Route field to the following: New Prescription screen (formats 1-3), Delivery Information tab of the Rx Summary > Filling Options screen, and Delivery Information tab of the Transaction (Label Only). To use, the Delivery Method must be set to Delivery. The Delivery Route field populates on the New Prescription screen based on the patient's Delivery Route. The Date Due populates based on the delivery schedule attached to the route. If a patient route is not selected, the facility route closest to the time the order is entered is used.