19.1.21 NRx Enhancements
Added the ability to light
all RetrieveRx® bags simultaneously when using the Return to Stock feature
When the Return to Stock feature is used,
the following message displays: Please do not try to assign a bag or locate
a bag through NRx or Point of Sale until the "Return to Stock"
process has finished. Once OK is clicked, the Return to Stock window displays.
A Light All
button was added to the Return to Stock window. Click Light All and a
prompt displays to select the time/duration for the light on the bags
to remain on. Options are 1, 2 or 5 minutes. 2 minutes is the default.
Once OK is clicked on the Return to Stock - Light All window, the system
lights all the bags in the grid in red.
Modified the Employee Record to display Color
LED 1/LED 2 drop-down options as Red/Off
(Reserved)and Red/Red (Reserved).
Also modified the Workstation Will Call Bag
Identification window to include Color LED 1/LED 2 drop-down options as
Red/Off (Reserved) and Red/Red
(Reserved).
Added the ability to manually
clear RetrieveRx bags
Added
a Clear Bag button to the Location
Warning window that displays when attempting to assign a bag that is already
assigned to a patient. Once the button is clicked, another Location Warning
window displays to alert the user which prescriptions are being cleared
from the bag so pharmacy staff can verify the prescription(s) are no longer
in the pharmacy. A grid displays the Rx number and patient name. Select
Clear Bag to clear the bag of any prescriptions. Select Cancel to close
the window without performing an action.
NOTE:
The Multiple Patient per Location Warning option
under Store Level Options, Workflow Queue Setup now defaults to On.
Modified the Rx Filling
Options and Defaults screen
The state of Mississippi
mandates that C3-5 prescriptions are not transferred.
Renamed
the Single Transfer Only of C3-5 Rx field Transfer
Only of C3-5 Rx. Added a drop-down
list with the following options:
No Transfer - A warning
message displays for transfer attempts if the
Transfer only of C3-5 Rx option is set to No Transfer.
Single Transfer - Allows transfers for C3-5
prescriptions that have not already been transferred.
Multiple Transfers - Allows multiple transfers
for C3-5 prescription until all fills are completed.
Added both options, Single
Transfer Only of C3-5 Rx and Transfer only of C3-5 Rx, to Customized Reports/Store
Options File. The former option was included in the case the setting of
the former option is needed.
If
the state code in Store Options is set to MS, Transfer only of C3-5 Rx
defaults to N - No Transfer. Otherwise, if Single Transfer Only of C3-5
Rx is selected, the updated option is set to S - Single Transfer. The
current warning message continues to display if the prescription has already
been transferred and another transfer is attempted. If Single Transfer
Only of C3-5 Rx was not selected prior to the update, the default = M
- Multiple Transfers.
Added the ability to interface
with Asembia1 (formerly ArmadaONE) for
Specialty Pharmacy
Added
authorization flag for Asembia1, an
interface that manages the fill of specialty prescriptions.
Added
a field, Specialty Patient,
to the Patient Record, Additional Info
screen. Added this field
to Customized Reports.
Modified the system to indicate drugs being
sent in data collections/interfaces for specialty pharmacy services
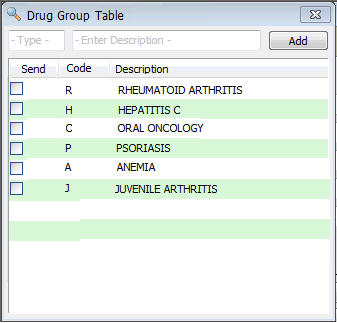
Added
a Drug Group Table hyperlink
to the Store Level Options, System screen. Click the link to display the
Drug Group Table
window. If the Send box is checked and the pharmacy is authorized for
Asembia1 or Diplomat®, prescriptions
for drugs with that Drug Group Code are sent to Specialty Pharmacy Services.
Up to 93 Drug Codes and Descriptions are allowed in the table. The Description
is a 31 alpha/numeric field. NOTE: The Drug Group Table may also be accessed
from the Drug Record, but can not be edited there.
Note:
Pharmacies not authorized for Asembia1 or Diplomat can use this functionality
to define their drug groups and add descriptions.
Added
a double arrow link beside the Group field on the Drug Record to access
the Drug Group Code Scan. When a Drug Record is saved, the Drug Group
Code is saved as well and displays in the Group field.
The following
fields were added to Custom Reports Store ID options: Drug
Group, Send, and Description.
Updated
the Diplomat interface to use the Drug Code Table Send setting to determine
which prescription information to send to the interface. Updated NRx to
send prescriptions for drugs with a Drug Group Code that is set to Send
in the Drug Group Table. NOTE: Those currently using the Diplomat interface
need to update the S Drug Group on the Drug Group Table to add a description
and check the Send option.
Added the ability to load payment file to reconcile A/R
payments
Added
the ability to post payments to patient accounts when customers have made
payments to the bank.
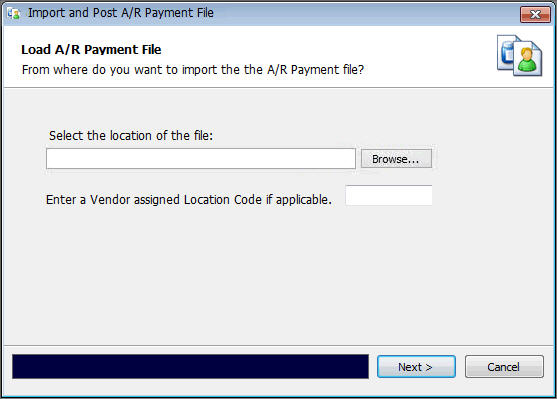
Added
an Import Payment File option
to A/R, Posting. Access to post iPayX payments. A Payment File Path, File
Name and Vendor Location Code must be entered on the Import
and Post A/R Payment File screen.
Created
an Imported A/R Payment Report. The report lists posting details as well
as information on why items did not post as follows:
No
match on A/R Account - Prints A/R Account not found after printing
file payment information
C-Account
Aged - Prints Customer Aged, Unable to Post
PayType - Voided - Prints Payment Voided
Pay
Type - Refunded - Prints Payment Refunded
Pay
Type - Declined - Prints Payment Declined
Pay
Type - Stopped - Prints Scheduled Payment Stopped
Pay
Type - Scheduled - Prints Future Payment Scheduled
DOES
NOT PRINT payments not posted for other location codes
Added VFI option to
the Invoicing module
When
the Use Invoice option in A/R Options is enabled, the A/R drop-down menu
changes. The Print Invoices option under A/R is changed to Invoices
(shortcut = ALT+I)
with options for Print Invoices
(shortcut = ALT+I)
and VFI Invoices (shortcut
= ALT+V). VFI Invoices
goes to the VFI Invoice Program and populates
the Select, Sort and Print Options.
Added fields to the VFI Layout
Added the following fields:
Mail
To: In Care Of: This field was added to the 03 Record and has a maximum
length of 35 characters. It pulls from the In Care Of field on the
Charge Account's Patient Record.
Copay:
This flag was added to the 07 Record and is a one-character field.
The field will be blank or populated with a C. A C displays if the
Charged Amount was a Third Party Copay Amount. The field is blank
if the Charged Amount was NOT a Copay.
Invoice
Number: This field was added to the 04 Record and has a maximum length
of 12 characters including the Invoice Date + Invoice Number. The
field pulls from the Invoice Number field on the AR Details Record.
NOTE: The Filler Length for all VFI Records has been adjusted so each record length equals
221 (223 including the CR/LF).
Modified the system to ease the prescription
transfer process
Added
the ability to search for Transfer Pharmacy from the Rx Processing Tasks
Search menu and the Edit, Search menu.
Added four new columns to the
Pharmacy Record Scan: Pharmacy's City, State, Zip Code, and Fax Number.
Added the patient's Birth
Date, in MM/DD/YYYY format, to the Patient
Profile. Modified the Transfer button on the Patient Profile. It now displays
as a drop-down menu with the following options:
NOTE: When the Transfer Prescription to Another
Pharmacy option is used, ALL Refills Remaining for the prescription will
be transferred, even if only one Rx is selected to transfer. Using this
option ignores the Store Level, Rx Filling option Number of Refills to
Transfer.
NOTE: When prescription transfers are saved, the
prescription is flagged as inactive and the following message displays
in green on the bottom of the screen: Rx
Transferred To Another Store - Cannot Fill This Rx.
NOTE: If the State Code is NY, then the Transfer
Prescription to Another Pharmacy will not be displayed due to refill transfer
restrictions.
Added the Prescription
Transfer Details report, which is generated and faxed to the receiving
pharmacy. This report also prints when any of the Print Options are used.
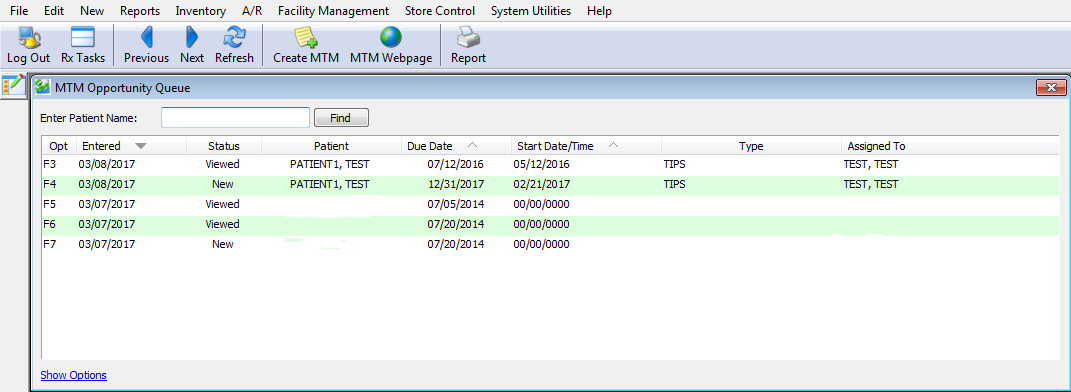
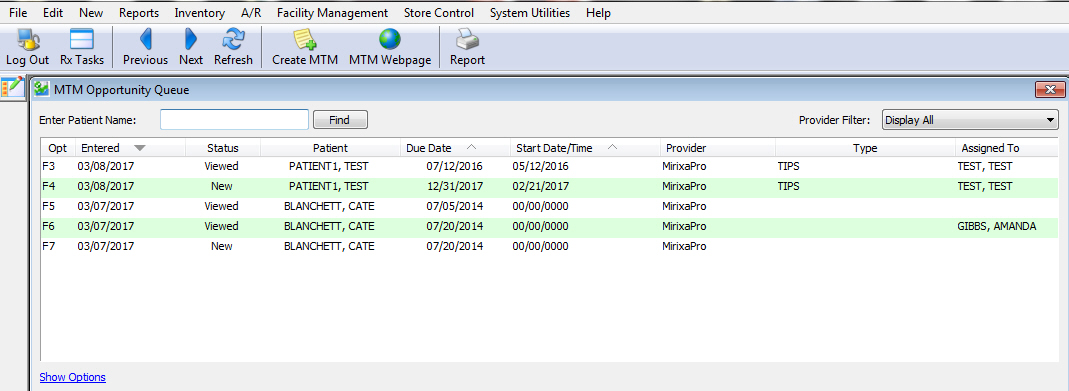
Added Mirixa® Interface
Functionality
For customers authorized for Mirixa MTM interface
and/or Outcomes MTM interface, MTM
Opportunity Queue was added to display all vendor-generated
opportunities and manually created opportunities stored in the MTM File.
The MTM Opportunity Queue is accessible from Rx Processing Tasks, MTM
Eligible link on the Patient Record, Rx Record, Patient Chart and Workflow's
Label & Dispensing and Quality Assurance Check. MTM records are created
when the system matches a QS/1 Patient Record against the Mirixa response
file.
Added
MTM File to Verify, Rebuild Keys,
Compress File, Copy File, Clear File, Reload File and File Purges in System
Utilities, File Maintenance.
Added MTM Queue
Access flag to Store Control, Security Access, Manage Employees.
The MTM Queue Access flag was added to the Employee Report and Employee
Security Journal Report.
Added View
MTM flag to Pharmacy at a Glance Security Rights in Store Control,
Security Access, Manage Employees.
Added a link, Single
Sign On, to the Employee Detail screen to allow the employee to
enter their Mirixa User ID for automatic login to Mirixa's Web page.
Added
MTM Table (shortcut = ALT+M) to
Store Control to allow pharmacies to customize the MTM process. Note:
The Counseling Data flag under Store Control in Store Control, Security
Access, Manage Employees will determine employee access to the MTM Table.
Added
a Patient MTM Opportunity Report
for customers authorized for Mirixa or Outcomes. The report that can be
printed from Reports/Patient, MTM Opportunity Queue or the Patient Chart
as set out below:
Available print options are Print Summary
and Print Detail. Select Print Summary to print one line per record
and Print Detail to print several lines.
When the report is selected from Reports/Patient
or MTM Opportunity Queue the system will populate Select, Sort and
Print Options.
When selected from the Patient Chart, the
report will print based on Patient Code of the current Patient Record
and the limited Select and Print options available. The report will
automatically sort by patient last name and then by entered date.
Can be added as scheduled report in the
Report Scheduler.
Added MTM
Opportunities print option to the Patient Chart Report.
Added MTM File
to Customized Reports and Data Export.
Added Outstanding
MTM to Pharmacy at a Glance Counter. The counter will only include
MTM records with a status of New or Viewed.
Modified the system to print Med
Guides and monographs at checkout
The
option Print Drug Materials,
in Store Level Options, Workflow Queue Setup, now applies to prescriptions
checked out through Point-of-Sale. Set up Workstation Printing for Prescription
Processing.