The Document Settings option is used configure the system for QS/1's Document Imaging Module. This module is used to scan hard copy documents such as prescriptions, driver's licenses, insurance cards, etc. and create digital files and store them in your QS/1 pharmacy system. The records which can be scanned using this module are:
Drug Record
Facility Documents
Patient Insurance Record
Non-Drug Orders
Patient Record
Prescriber Record
Prescription Record
Prescription Transaction Record
The Document Imaging Module must be purchased from QS/1 to utilize the scanning features for all records. If the module has not been purchased, only prescriptions can be scanned.
The advantages of using the Document Imaging Module include:
Easy access to documentation related to Drug, Insurance, Patient, Prescriber or Prescription and Transaction records
Ability to use security features to ensure HIPAA compliance and protect patient privacy
Create an accurate and organized audit trail
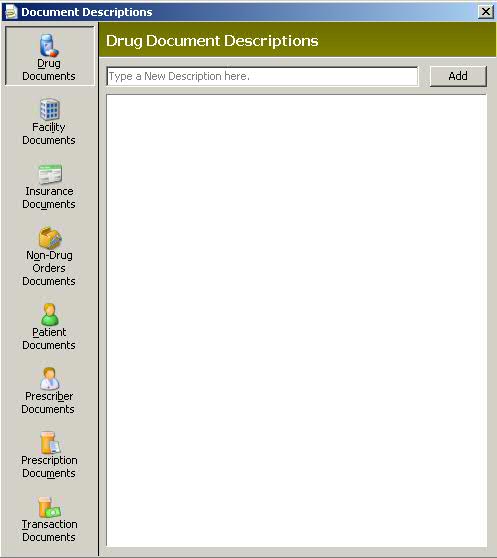
Before scanning a document, a description must be entered in Store Control/Document Settings.
To enter a document description:
1. Access NRx.
2. Click Store Control. Select Document Settings and click Document Descriptions. The Document Descriptions window displays:
3. Click the icon for the type of document record to add and type the
description of the document. Click  .
.
4. To edit a description, highlight the description, type the edit and
click ![]() .
.
To scan and save the document:
1. Access the Patient Record for the document to be scanned.
2. Click ![]() on the Patient Record main tool bar.
Select Documents.
on the Patient Record main tool bar.
Select Documents.
3. The Documents Available window displays:

4. Documents that have been scanned for the patient display in the above window. Select a document and click Thumbnails to view the document.
5. To scan a document for the patient, click ![]() on the
main tool bar. Do not close the Documents Available window; the New Document
icon only displays if that window is open. After clicking the icon, the
Select Document Type window displays:
on the
main tool bar. Do not close the Documents Available window; the New Document
icon only displays if that window is open. After clicking the icon, the
Select Document Type window displays:
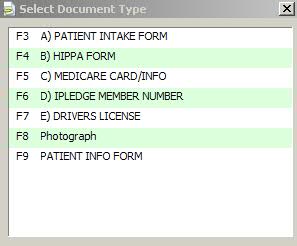
6. Select a document type to scan. Insert the document to be scanned and click OK. The scanned document displays.
7. Documents may be re-scanned or printed by clicking the buttons at the bottom of the screen. If the document is scanned properly, close the window.
8. The Documents Available window displays the new scanned document, the date scanned and the document file name.
Return to Set Up Store Control Options