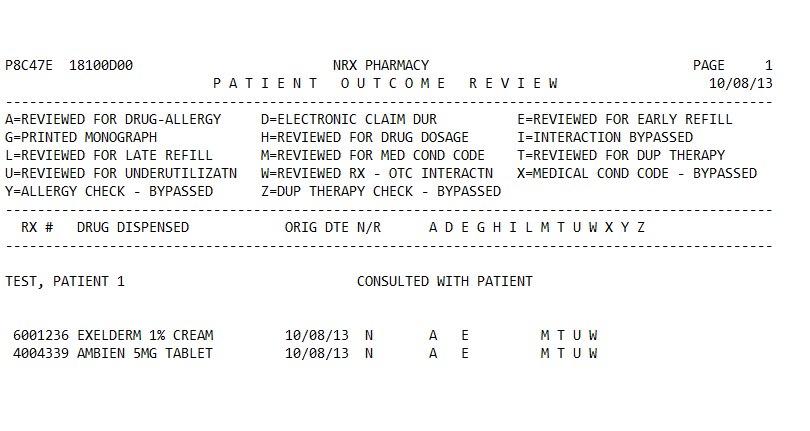
The Patient Outcome Review Report lists the following: DUR Functions performed during a user-defined date range, Patient Outcomes entered during a user-defined date range and automatic checks (allergies, interactions, early/late refills) performed during a user-defined date range. Sample Report
The process of generating a report in NRx involves a set of steps referred to as Report Logic. These steps include selecting data, sorting the selected data in a certain order and then printing the report. Review Reports Overview for details on these steps.
 Pharmacist/Technician Security Access under Management
Reports must be checked to access this report option.
Pharmacist/Technician Security Access under Management
Reports must be checked to access this report option.
To run this report:
1. Access NRx.
2. Click Reports. Select Management and click Patient Outcome Review. Select Options display.
3. Complete the Select Options and click Next. There are no Sort Options for this report. Print Options display.
4. Use the following definitions to complete the Print Options:
Begin Date: Type the beginning date of the report period.
End Date: Type the ending date of the report period.
Outcome Codes: Type up to seven Outcome Codes to print. Do not put spaces between the codes.
Omit Clinical: Type YES to print only the Rx # and Original Date. Type NO to print the Rx #, Original Date and clinical information for each prescription for the patient.
Progress Notes: Valid entries are: YES=Print only the Patient Progress Notes, NO=Print Patient Outcomes, ALL=Print both Patient Notes and Outcomes. Type the Medical Condition Code or Alternate Code to print Progress Notes associated with that code.
Print Trans: Type ONLY to print the Patient's Transactions. Type NO to print only Outcomes. Type YES to print both.
Outcome Date: Type YES to print the Outcome Date in the Orig Dte column on the report.
5. Click Finish. The report prints.