 Before you start the Automatic Drug Reorder process,
verify that your Drug Inventory Records and Vendor Records are complete
and accurate.
Before you start the Automatic Drug Reorder process,
verify that your Drug Inventory Records and Vendor Records are complete
and accurate.Before you start the Automatic Drug Reorder process,
verify that your Drug Inventory Records and Vendor Records are complete
and accurate.
The Automatic Drug Reorder Report compares the Quantity On-Hand to the Min Inventory Level on the Drug Inventory Record and prints a report that indicates the quantity to order. The order amount brings the Quantity On-Hand level up to the Min Inventory Level. If the Print Option Review or Update is set to Update, the Drug Inventory Records automatically update.
The procedures below document the process of creating the order and then sending the order.
To Create an Order:
1. Access NRx.
2. From the main menu bar, click Inventory, Auto Drug Reorder. Select Options display:
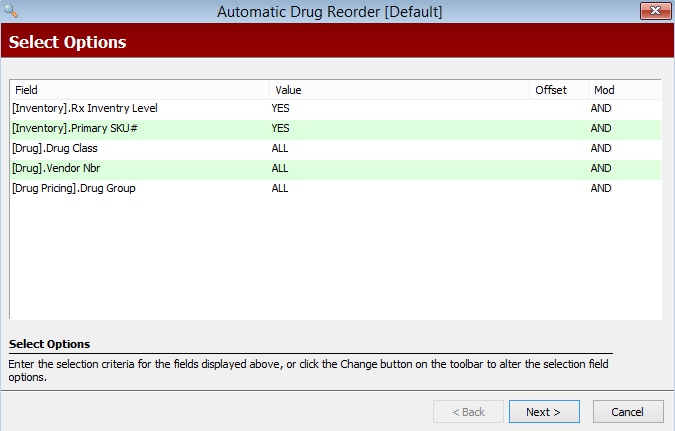
3. Type YES in both the Rx Inventory Level field and Primary SKU# field to ensure only those drugs with a Min Inventory Level and Primary SKU# are selected for ordering. Complete the remaining fields per your preference and click Next. Sort Options display:
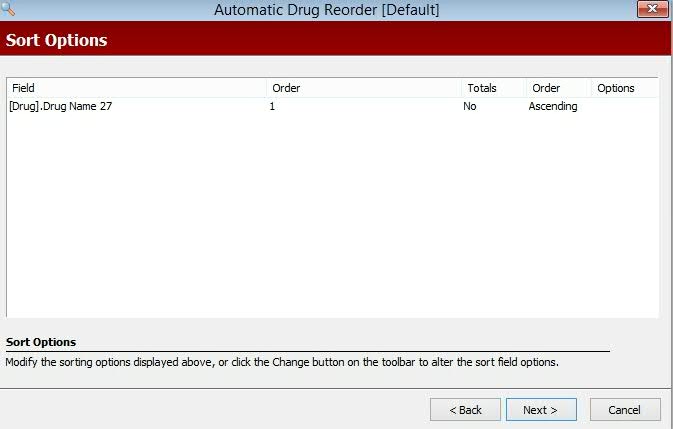
4. Complete the Sort Options and click Next. Print Options display:
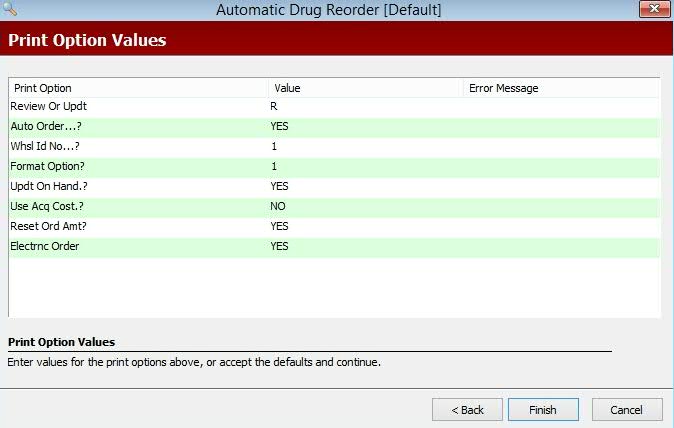
5. Complete the Print Options using the following definitions:
Review or Update: Type R to print the review without updating Drug Inventory Records. Type U to print the review and update Drug Inventory Records.
Auto Order: If updating the Drug Inventory Records, type YES to order all drugs listed on the Report. Type NO to review each item on the Update drugs on order screen and adjust the order quantity as needed.
Wholesaler ID Number: Type 1 to use the primary wholesaler number from the Drug Inventory Record. Type 2 to use the secondary wholesaler number.
Format Option: Valid entries are:
1 = Print the NDC number in the first column of the report
2 = Print the Drug Name in the first column of the report
3 = Print the NDC number in the first column of the report; print MTD and YTD totals from the Inventory Record on the second line of the report
Update On-Hand: Type YES to update the Quantity On-Hand value on the Drug Inventory Record. Type NO to run the program several times without affecting inventory. One application for this option is contract purchases that are not delivered until a later date. If NO is entered, you must update the Quantity On-Hand after printing the Wholesaler Report, or manually after receiving an invoice from the wholesaler.
Type
NO if updating Quantity On-Hand through Automatic Drug Receiving or receiving
the Purchase Order Acknowledgment. The Automatic Drug Receiving program
updates the Drug Record by adding the On-Hand field to the value of the
Amount on Order field. Use this program each time a new order is received
if you do not use the Update On-Hand program in the Automatic Drug Reorder
Report.
Use Acquisition Cost: Type YES to use acquisition cost instead of average wholesale price.
Reset Order Amount: Type YES to reset the Reorder Amount previously set on each Drug Inventory Record to zero. NOTE: YES must be entered if the order is processed electronically. Type NO to maintain the previous Reorder Amount. Otherwise, the system updates this amount if a new quantity is calculated during the reorder process.
Electronic Order: This field works in conjunction with the Update On-Hand Print Option and indicates how the system updates the Quantity On-Hand and Reorder Amount fields on the Drug Inventory Record. Valid entries are:
If Update On-Hand = YES and Electronic Order = YES, the system updates the Quantity On-Hand and Reorder Amount fields.
If Update On-Hand = YES and Electronic Order = NO, the system updates the Quantity On-Hand field, but not the Reorder Amount field.
If Update On-Hand = NO and Electronic Order = NO, the system does not update the Quantity On-Hand field, but updates the Reorder Amount field.
Electronic Order must = YES to update the Last Order Date on the Inventory
Record during Automatic Drug Reorder when Review/Update is set to U.
6. When options are complete, click Finish. If you selected to update Drug Inventory Records, but did not select to use the Auto Order feature, the system begins sorting Drug Records. If the system encounters a record where the Quantity On-Hand is less than the Min Inventory Level, the item displays on the Update Drugs on Order screen. Highlight the item to edit and type the correct number of packages to order. Click Update.
7. To add an item to Update Drugs on Order screen, scan the item or search by Drug Name, NDC # or GCN#. The Add Drug Confirmation window displays. Click Add.
8. When the order is correct, click Complete Order on the Update Drugs on Order screen.
To Send an Order:
When the Automatic Drug Reorder Report (steps above) is complete and the Drug Inventory Records are updated, the order is ready to send to the wholesaler.
When
the Electronic Order Information window on the Vendor Record is set up
with 4099 as the transmission program, the system automatically creates
the EDIORDER.TXT file on the hard drive to be transmitted to the wholesaler's
FTP site.
Follow the steps below to send an order:
1. Access NRx.
2. From the main menu bar, click Inventory. Select Electronic Drug Reorder and click Send an Order. Select Options display:
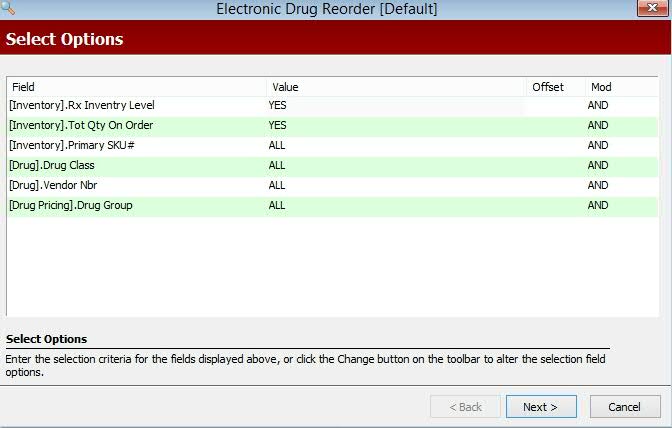
3. Complete the Select Options using the following definitions:
Rx Inventory Level: Accept the default of YES.
Total Quantity on Order: Accept the default of YES.
Primary SKU #: Type YES to select Inventory Records that have an entry in this field.
Drug Class: Type one, several or a range of Drug Class Codes. Type ALL to select all classes.
Vendor Number: Type one, several or a range of vendors by typing the first five digits of each vendor's NDC number. Type ALL to select all vendor numbers.
Drug Group: Type one, several or a range of Drug Group codes. Type ALL to select all groups.
4. When entries are complete, click Next. Print Options display:
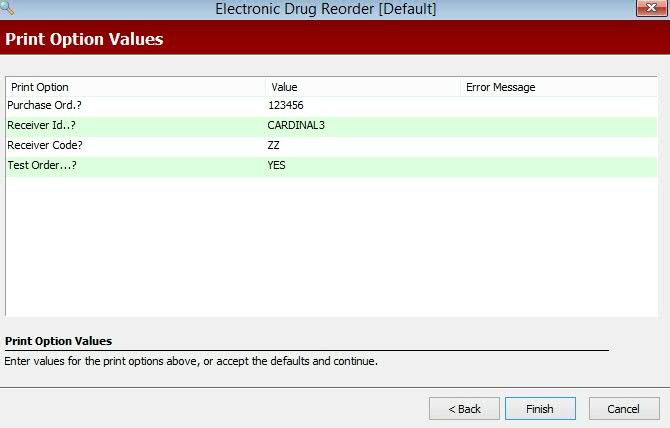
5. Complete the Print Options using the following definitions:
Purchase Order: This is a numeric field only. Type a purchase order number, using a different number each time an order is placed. The most commonly used entry is the date the order is transmitted.
Receiver Id: Type the Receiver Id specified by the wholesaler. Contact the wholesaler or QS/1 Customer Support for this information.
Receiver Code: Type the Receiver Code specified by the wholesaler. Contact the wholesaler or QS/1 Customer Support for this information. This code is required by most wholesalers and is recognized as the Receiver ID Qualifier. If problems occur, try values of ZZ, 12 or 01. Type 01 if you use Bergen.
Test Order: Type YES to process this order for test purposes.
6. When the entries are complete, click Finish.
7. The system prompts for the Vendor. Select the Vendor and click OK.
8. The prompt, # Records Dumped to Btchcom; Transmit Data?, displays. Verify the number of records dumped to the Btchcom File matches the Automatic Drug Reorder report. Click Yes.
9. The prompt, Do You Want To Print The Session?, displays. Click No.
10.The transmission begins and the Processing screen displays the vendor name and the transmission baud rate.
To Send an Order via FTP
1. Access NRx.
2. From the main menu bar, click Inventory. Select Electronic Drug Reorder and click Send an Order.
3. Select Options display; click Next.
4. Print Options display; click Finish.
5. The system prompts for the Vendor. Select the Vendor from the drop-down; click OK.
6. The prompt, ASAP Order Placed On The Hard Drive-Click OK to Exit, displays; click OK.
7. The system transfers the file to the wholesaler's FTP site; click OK.
8. The prompt, Do you wish to print the log file?, displays; click Yes.
Return to Inventory Control Overview