The two methods for transferring prescriptions are from store to store or from patient to patient. The patient-to-patient transfer is used most commonly when the prescription was filled for the wrong patient during the initial filling process. The store-to-store transfer is typically used for patient convenience.
The pharmacist/technician and date/time are logged for both incoming and outgoing transferred prescriptions. The date/time will not change when a transfer is created for both incoming and outgoing prescriptions. The pharmacist/technician is auto populated when Save is selected. For an incoming prescription, this is the receiving pharmacist/technician; for an outgoing prescription, this is the transferring pharmacist/technician.
Transfer a Prescription from Patient to Patient
1. Access NRx.
2. Access the Patient Record that you are transferring the prescription FROM.
3. Click ![]() to access the patient's
prescription profile:
to access the patient's
prescription profile:

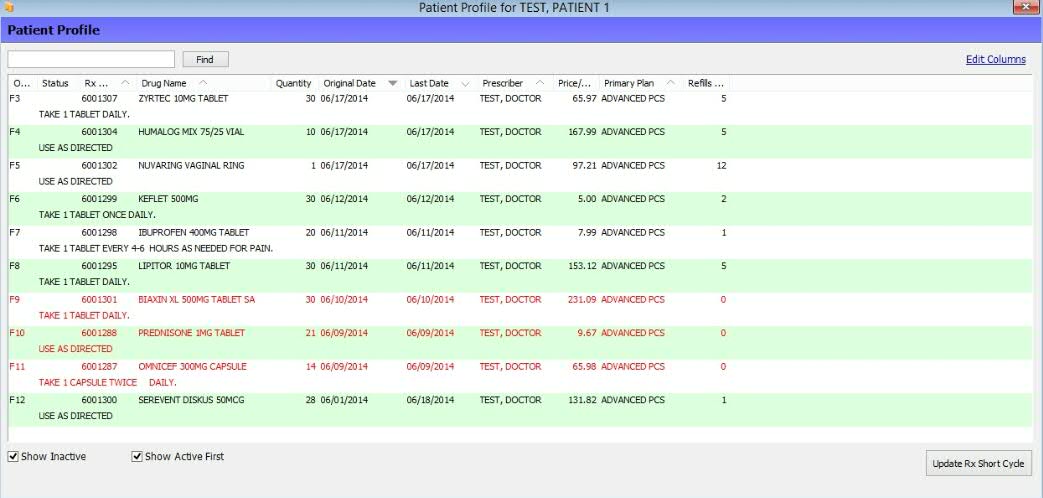
4. Highlight the prescription to transfer. Click ![]() and select Transfer Prescription to Another
Patient. The Patient Scan displays:
and select Transfer Prescription to Another
Patient. The Patient Scan displays:

5. Select the patient to transfer the prescription TO. Double click the patient. The transfer is complete.
Transfer a Prescription from Store to Store
1. Access the Prescription Record for the prescription you are transferring.
2. Click
![]() . The
Transfer Information screen displays Outgoing
Transfer Information.
. The
Transfer Information screen displays Outgoing
Transfer Information.
3. For Outgoing Transfers, complete the Pharmacy and Pharmacist information. Click the arrows next to Pharmacy Name. If the pharmacy to transfer to is listed, double click that pharmacy and the pharmacy information automatically populates.
4. If
the pharmacy is not listed, click ![]() ,
type the information and click Save. When
all information on the screen is complete, click
,
type the information and click Save. When
all information on the screen is complete, click  . The
Transfer Prescription screen displays.
5. Click Transfer and Print or Fax Details; the Transfer Details screen displays. Click Print Transfer Details to print the Prescription Transfer Details report or Click Fax Transfer Details to fax the report to the receiving pharmacy. Click Transfer Only to transfer the prescription without printing the report. Click Cancel to return to the Patient Profile without transferring the prescription.
6. The outgoing transfer is complete.
7. For Incoming Transfers, create
the prescription. Prior to filling the prescription, click ![]() on the Patient Prescription
Record. The Incoming
Transfer Information screen displays. Click the arrows
next to Pharmacy Name. If the pharmacy to transfer to is listed, double
click that pharmacy and the pharmacy information automatically populates.
on the Patient Prescription
Record. The Incoming
Transfer Information screen displays. Click the arrows
next to Pharmacy Name. If the pharmacy to transfer to is listed, double
click that pharmacy and the pharmacy information automatically populates.
8. If the pharmacy is not listed, click
![]() , type the information
and click Save. When all information
on the screen is complete, click
, type the information
and click Save. When all information
on the screen is complete, click  . The Transfer Prescription screen displays.
9. Click Transfer and Print or Fax Details; the Transfer Details screen displays. Click Print Transfer Details to print the Prescription Transfer Details report or Click Fax Transfer Details to fax the report to the receiving pharmacy. Click Transfer Only to transfer the prescription without printing the report. Click Cancel to return to the Patient Profile without transferring the prescription.
10. Click General on the vertical icon bar and fill the prescription as usual.
11. The incoming transfer is complete.
Transfer Multiple Prescriptions from Store to Store
1. Access the Patient Record for the prescription(s) you are transferring.
2. Click ![]() to access the patient's prescription profile.
to access the patient's prescription profile.
3. Select Transfer Prescriptions to Another Pharmacy from the Transfer drop-down list. The Prescription Transfer Information screen displays.
NOTE: Due to transfer restrictions, Transfer Prescriptions to Another Pharmacy does not display if the State Code in Store Identification is set to NY.
3. Click the arrows next to Pharmacy Name. If the pharmacy to transfer
to is listed, double click that pharmacy and the pharmacy information
automatically populates. If the pharmacy is not listed, click ![]() ,
type the information and click Save.
,
type the information and click Save.
4. Click  and check the box
next to the prescription(s) to be transferred.
5. Click  on the horizontal toolbar and the Transfer
Prescription screen displays.
6. Click Transfer and Print or Fax Details; the Transfer Details screen displays. Click Print Transfer Details to print the Prescription Transfer Details report or Click Fax Transfer Details to fax the report to the receiving pharmacy. Click Transfer Only to transfer the prescription without printing the report. Click Cancel to return to the Patient Profile without transferring the prescription(s).
 Set the number of refills that can be transferred in
Store Level
Options/Rx Filling Options.
The Transfer In/Out Date is system generated once the Transfer Information screen is complete.
The Rx has been Discontinued and Transferred - Cannot fill this Rx message displays and prevents filling the prescription if all fills (Refills Authorized + Initial fill) are transferred.
NOTE: If you do not transfer the full amount of refills remaining, the system does not display a message because technically there are still fills remaining on the Rx at the pharmacy.
If an Incoming Transfer prompts the Price Plan message, XXXX Refills Transferred on XX/XX/XX, the prescription cannot be filled until the Allow Fill message = YES.
Return to Common Prescription Processing Functions